


Image: Shutterstock
Dogs are the best companions for your little one as they inspire us to love unconditionally. Kids love dogs, and for most of them, it is their favorite animal. If you are wondering how to draw a dog for kids, this post with instructions is for you. Teaching your child the right way to draw a dog with some simple and easy steps is not a difficult task if you follow the step-by-step tutorial in this post. Scroll down.
1. How To Draw A Cartoon Dog
Dogs are cute. There are no two ways about it. But do you know what is cuter?
A cartoon dog, of course! So let’s start with a simple step by step drawing of a cartoon dog for beginners.

![]()
You will need:
Pencil, eraser, drawing paper, colored pencils or crayons
How to draw:
- Start by drawing six small, conjoined circles at the center of the page, slightly towards the bottom. The circles should be of the same size. You can first draw a straight line and then draw the circles on it, if it helps. See figure 1.1.
- Make the body of the dog by drawing a small semi-oval starting between the first two circles and ending between the third and the fourth. With the top of the oval as the starting point, draw the rest of the body as shown in figure 1.2. You have the head and the body of the dog ready.
- Draw small lines inside the four base circles, as shown in figure 1.3 to complete the paws.
- Add ears to the head and a small tail to the rear end, as illustrated in figure 1.4.
- Add details like the eyes, nose, and the brows. See figure 1.5.
- Add details like the eyes, whiskers, nose, and the brows. See figure 1.5.
- Your cartoon dog is ready to be colored.
2. How To Draw A Realistic Dog
Want to depict a real dog on paper? In this tutorial, let us draw a dog, a Dachshund to be specific, that looks real, life-like.

![]()
You will need:
Pencil, eraser, drawing paper, colored pencils or crayons
How to draw:
- Start by drawing the outline of the dog’s body. The Dachshund has a sleek, horizontal body. So be careful not to draw it taller than it should be. See figure 2.1.
- Gently extend the base to add the forelegs, belly, and the hind legs. Observe that the legs of the dogs are very short, and should be kept that way to get a realistic impression. See figure 2.2.
- Go on to add detail to the picture. Add the ear by drawing a curved line above the neck. Dachshunds have very big ears compared to other dogs. A small line near the jaw should indicate the mouth and another curvy speck near the edge of the jaw for the nose. See figure 2.3.
- Draw the eye and start shading the image in black and brown, to give it a realistic look.
3. How To Draw A Sitting Dog
An obedient dog sits down when you tell it to. This tutorial teaches you how to draw a sitting dog easily.

![]()
You will need:
Pencil, eraser, drawing paper, colored pencils or crayons
How to draw:
- Draw a circle. Then draw an oval overlapping the circle, as shown in figure 3.1.
- Extend lines from the bottom of the oval to draw legs. See how the front paws are slightly pointed to the front. Erase the sides of the top circle a little to make space for ears. Draw the ears as shown in figure 3.2.
- Draw the rest of the body – we will only draw part of the body, as the dog is sitting down. Also add the hind paw as illustrated in figure 3.3. Do not miss the minute details like the little, curved lines on the paw and the back.
- Erase part of the circle and the oval and let them stay joined at the ends, creating the face and the neck. See figure 3.3.
- The next step is to add details to the face: the eyes, a nose, and the tongue. See figure 3.4.
- Add finer details such as the lines on the paws. Erase a small portion of the oval at the bottom, attached to the left leg of the dog for the torso. See figure 3.5.
- A sitting dog is now ready to be colored.
4. How To Draw A Dog Face
Is drawing an entire dog too much work? Try drawing just the face of the animal. It’s simple! If you have a good freehand, you can draw a dog’s face in just a few minutes.

![]()
You will need:
Pencil, eraser, drawing paper, colored pencils or crayons
How to draw:
- Start by drawing a slightly-rounded ellipse. Extend the ellipse upwards by drawing half-an-oval with the ellipse as the base. See figure 4.1.
- Draw the ears as shown in figure 4.2. Notice that the ears are as big as the face.
- Draw two small egg-shaped eyes, touching the top of the ellipse. Draw two smaller rounds inside for the eyeballs. See figure 4.3.
- Add details like the nose, mouth, tongue, and three dots on either side of the nose. See Figure 4.4.
- Let’s make the dog a little pretty by adding a bow on top.
- Color it as you like.
5. How To Draw A Dog Lying Down
They say, let sleeping dogs lie. Dogs are the cutest when they are sleeping. This tutorial will teach your kids how to draw a dog at its cutest.

![]()
You will need:
Pencil, eraser, drawing paper, colored pencils or crayons
How to draw:
- Start the art by drawing the head of the dog. The first step involves drawing multiple features including the ears and the nose. Take your time drawing this. You can erase and try it until you get it right. See figure 5.1.
- Now sketch a part of the body as shown in figure 5.2. Notice that the lines are curvy and slightly bumpy here and there.
- Add details to the image with lines for the folded hind paw. Another line bent and slightly curved below the face is for the right forepaw. See figure 5.3.
- In this step, we will add the other front paw, on which the dog’s head is resting. See figure 5.4.
- Add the eyebrows and nose as illustrated in figure 5.5.
- Add the eyes (shut) as shown in figure 5.6. Try to get the shape as shown in the image to make it seem natural.
- The final step is to add the tail. See figure 5.7.
Drawing a sleeping dog can be complicated. Encourage your child to use a freehand to draw the sleeping dog, and don’t rush them if they’re just getting started with drawing and sketching.
6. How To Draw A Cute Puppy
Now that we are done drawing a sitting, sleeping, and a standing dog, we will learn step by step drawing of a puppy.

![]()
You will need:
Pencil, eraser, drawing paper, colored pencils or crayons
How to draw:
- Let’s begin by drawing the face of the puppy. Notice that one side of the face is bumpy to indicate the folds of its chubby cheeks. Add the ears too, as illustrated in figure 6.1.
- Next, draw the front legs and torso. Start with a curved line from the chin and extend that to the left fore leg. You can draw the other leg starting from the torso, as shown in figure 6.2.
- Extend the body to draw the back. A curvy line starting from the left ear makes the back. Extend it to draw the tail. Draw the belly and the hind legs as shown in figure 6.3.
- Add the eyes, nose, and a curvy line on the face for the mouth and your puppy is ready to be colored.
7. How To Draw A Bulldog
Drawing a bulldog can be a tricky task because of the many folds it has on its body! But hey, we’ll make it a less daunting task for you, with these simple steps.

![]()
You will need:
Pencil, eraser, drawing paper, colored pencils or crayons
How to draw:
- Draw a circle with freehand. A little to its right, draw a slightly bigger circle. Draw another circle, one that is equal in size as the first one, overlapping the bigger circle. See figure 7.1. Draw the circles lightly, so that they can be erased later.
- Use the circles as a base to draw the outline of the body and the legs. See figure 7.2.
- Draw the front legs as illustrated in figure 7.3. Add details like the eyes, nose, tongue, ears and the mouth to complete the face. Before you do, erase the intersecting lines within the circle. Also, erase part of the larger circle inside the face. This will make adding the details easy.
- Draw the hind legs and add the tail. A bulldog’s tail is short and curled. Add a few small lines on the body to indicate the folds. See figure 7.4.
- Now, erase the lighter lines to get the resultant figure 7.5. You can also clear these lines before step 5 for convenience.
- Once done, you can color it black or brown and white.
8. How To Draw A Dalmatian
The Dalmatian is one of the most popular breeds of dogs in the world, thanks to the black spots it has on its white smooth coat. The interesting fact though is that these dogs are born spotless! Did you know that? Learn this easy drawing of the Dalmation dog.

![]()
You will need:
Pencil, eraser, drawing paper, colored pencils or crayons
How to draw:
- Start by drawing the outline of the body of the Dalmatian. To make it simpler for your kid, we have used only circles and lines for this. Use a low grading pencil to draw these lines, as you will need to erase them later. See figure 8.1.
- Using the circles as the base, draw the body of the Dalmatian. Also add the eyes, eyebrows, nose and the mouth as illustrated in figure 8.2.
- Extend lines down from the body for the legs. The image will give you a clear view of the front legs and the left hind leg. Only a small portion of the right back leg will be seen in the drawing. See figure 8.3.
- Add the tail and complete the structure as illustrated in figure 8.3. Once done, erase the baselines used for drawing the body.
- Add spots on the body as seen in figure 8.4. You can let the child add these spots randomly rather than taking them exactly as shown in the image, to make them look natural.
- Color the spots black and leave the rest to complete your Dalmatian.
9. How To Draw A Dog House
Okay, so we have a Dachshund, a Bulldog, a Dalmatian and a Labrador puppy! All we need now is a happy home for the canine friends. This tutorial will teach your child just that – how to draw a dog house in easy steps.

![]()
You will need:
Pencil, eraser, drawing paper, colored pencils or crayons
How to draw:
- Start by drawing the roof. Draw a triangle (without the base) using your freehand. Extend from the pointed end and draw a rectangle to complete the roof. See figure 9.1.
- Extend lines from the edges of the roof to make walls. As this is a two-dimensional image, we can see only two sides of the dog house. Observe that the lines are smooth for the front walls and slightly bumpy at the back. See figure 9.2.
- Draw an arch indicating the entrance to the dog house. See figure 9.2.
- Outline the entrance to highlight the base of the house, as shown in figure 9.3.
- Add design details to indicate tiles or wooden planks, as illustrated in figure 9.4..
- Complete the design on the front elevation of the house.
- Color it.
Frequently Asked Questions
1. What are some tips for getting the proportions right when drawing a dog?
You can help your child get the proportions right by cutting out the basic shapes from a piece of cardboard. It might need some practice and patience. Your child can trace the basic shapes using the cutouts and then progress to the rest of the drawing.
2. How to add shading to dog drawings?
Your child may use pencils or markers for shading the dog drawing. First, help your child to identify the light source to know the areas to highlight and where to go for a dark shade. Next, use pressure to obtain a darker shade and lower stress for a lighter shade. Finally, blend the edges for a smooth finish.
3. What are some fun variations to try when drawing a dog?
You may add fun variations to the dog drawing for kids with a superhero cape or dress. You may add fancy collars to your drawing to make the picture more appealing.
Puppies and dogs are children’s favorite animals. Many times children tend to capture these pets in their drawings. You can help them gain mastery over their dog drawing skills with the help of this gide on how to draw a dog step-by-step . Although the drawings may seem complex, breaking the drawing into a few simple steps makes it easier for a child to draw. First, try to teach them the basic shapes and then progress toward illustrating other features of a dog from those shapes.
Infographic: Simple Ways To Draw A Dog For Children
Drawing is a fun activity to engage children of all ages, and drawing a dog can be a good theme for them. Look through the infographic below to learn some simple techniques to draw different types of dogs. These stepwise instructions can help children draw this pet animal while allowing you to teach love for animals among children.
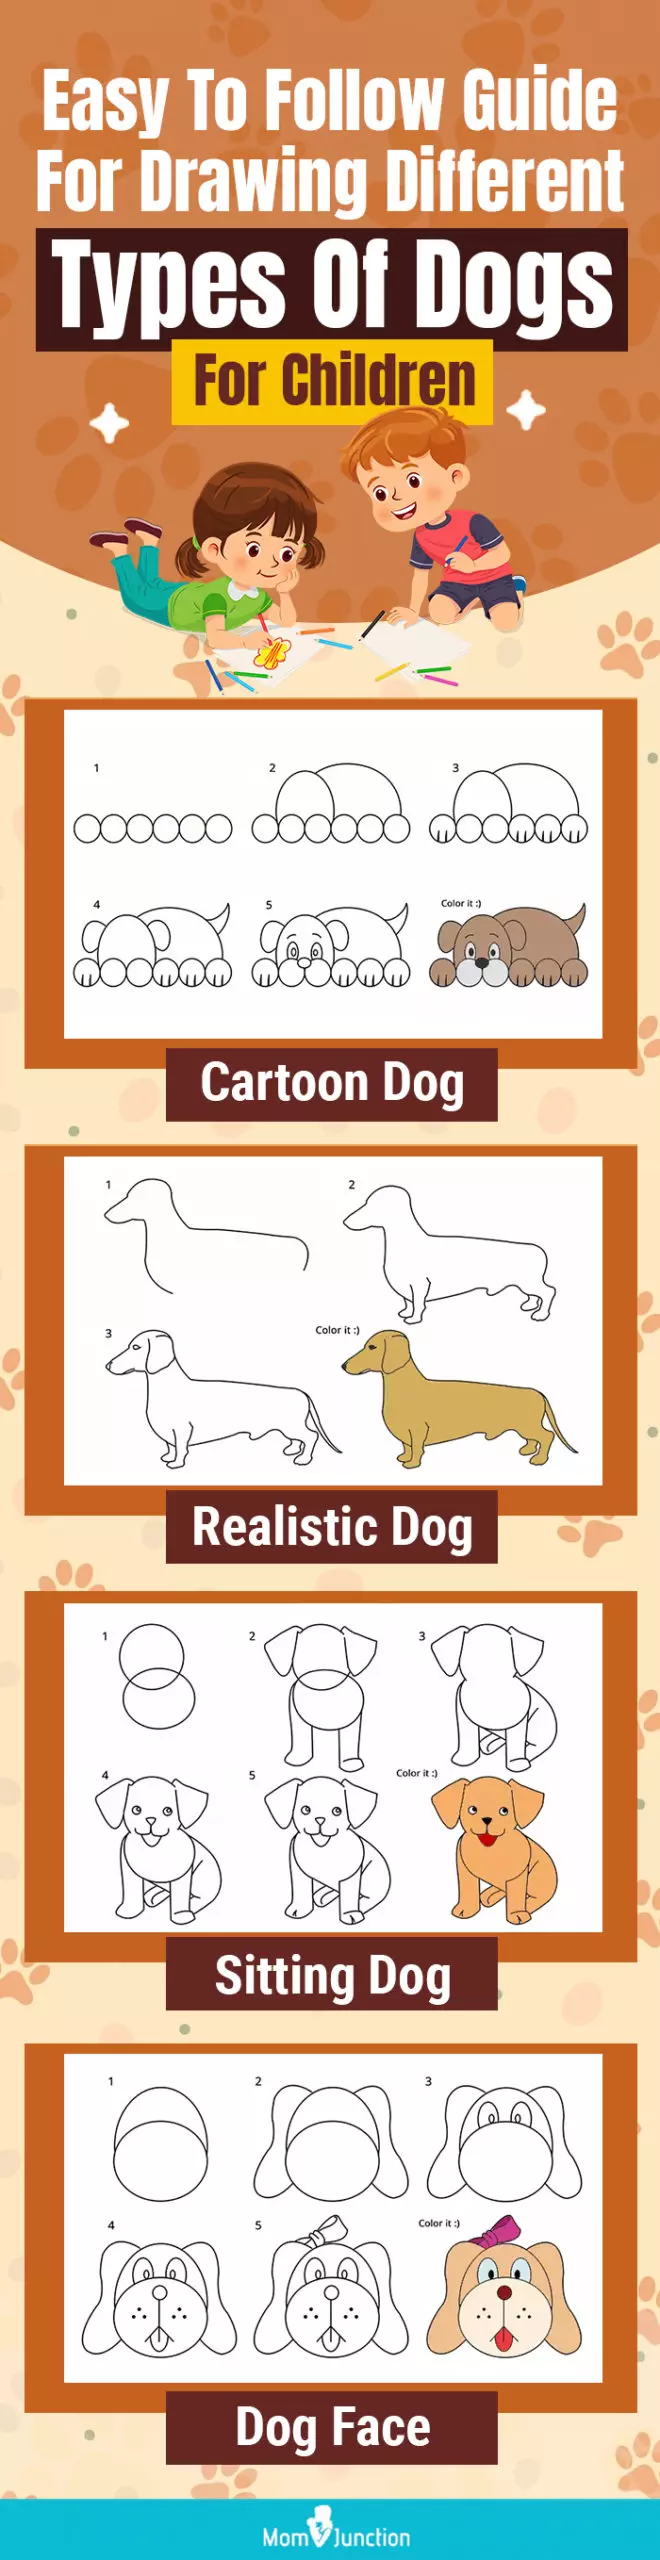
Illustration: Momjunction Design Team


Key Pointers
- Drawing is a creative and enjoyable free-time activity for children.
- If your child loves animals, especially dogs, introduce them to this fun guide on how to draw a dog.
- We provide detailed steps for drawing various types and positions of dogs, allowing your child to choose freely.
- Guide your child to begin with basic shapes before advancing to complex figures.
- Display your child’s masterpieces on your mantel to boost their confidence.

Learn how to draw a dog with this easy step-by-step tutorial! Follow along, and you’ll be drawing your pup in no time!


