Image: Shutterstock
From home to school, teenagers have tons of rules to follow, and art gives them that opportunity. As a parent, you want them to stick to the right path but also feel joy. Is there a way? Yes, there is. Allow them to unleash their creativity. Teenagers would love working on creative and colorful projects. Let them express their happiness, love, tastes, and frustrations through art. They can write, draw, or make beautiful things out of nothing. As they grow up, these creative outlets can also nurture complex skills and handicraft techniques like leatherworking, quilting, soap making, etc. Keep reading to discover some of the most incredible arts and crafts for teens that we have put together in this post.

Key Pointers
- The arts and crafts activities may also help teens focus their attention away from negative thoughts, curbing depression and anxiety.
- Parents can develop their teens’ interest in arts and crafts by encouraging creativity, providing positive reinforcement, and displaying their efforts to others.
- Activities like crafting a DIY Friendship Bracelet allow teenagers to unleash their creativity using basic materials such as string, glue, and beads.
- Creating Snow Globes or designing Enamel Spoons offers teenagers a relaxing escape from the routine.
Easy Craft Ideas For Teen Girls And Boys
Lanterns made out of wine bottles, planters out of tires, painting made by thumb impressions, flowers from paper crafts or making simple embroidery works.
Your options are limitless. These creations of art tell us that even the seemingly useless stuff can be transformed into objects of affection if you get creative. So, here we are with a few arts and crafts ideas for teenagers to unleash their creative side and hone their imaginative skills.
1. String Bowl
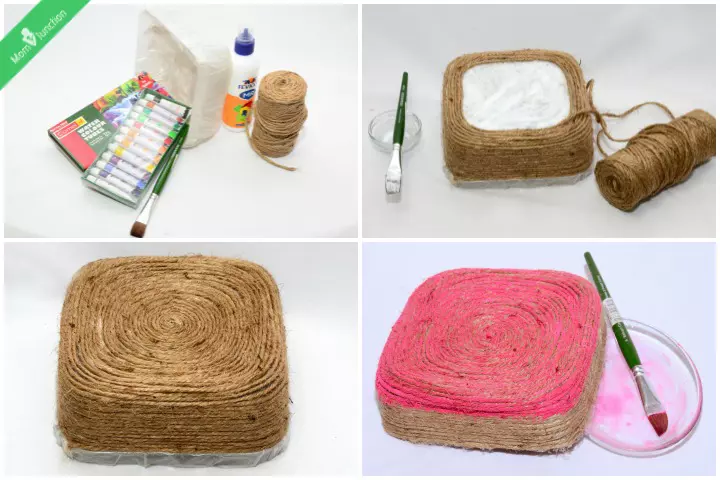
Who would’ve thought that you could use something as ordinary as a string for something creative? Here are simple steps to use string, glue, and color to create an ethnic-looking bowl.
You will need:
- String
- Craft glue
- Cling wrap
- Scissors
- Bowl (as mold)
- Paintbrush
How to:
- Take a bowl and wrap it up with the cling wrap tightly.
- Use the paintbrush to coat the outer layer of the cling wrap with glue. Cover it completely with glue.
- Take one end of the string roll and wrap it around the open end of the bowl. Continue wrapping the string, creating a single layer below another, as shown in the image.
- Carefully wrap until the entire dish is covered. You can paint the base in any color you want.
- Let it dry and remove the bowl used as the mold.
 Did you know?
2. Pinwheel Wreath
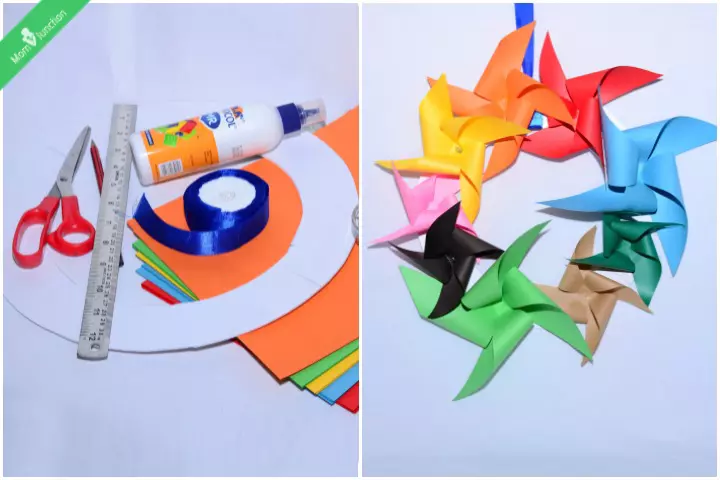
A wreath is usually made of flowers, leaves, or twigs. If you are creative, it can be made of anything, such as fruits, wool, or even paper. Here is our version of a colorful wreath made entirely of paper pinwheels.
You will need:
- StyrofoamiA tough but lightweight plastic foam used as packaging material Brand Foam
- Round Face Wreath, 12″ x 2-1/2″ x 1″
- Red acrylic paint
- Double-sided scrapbook paper in different colors and prints
- One card stock paper
- Blue Ribbon, 1″ x 8″
- Pencil
- Metal-edged ruler
- Medium flat paintbrush
- Scissors
- Circle punch
- Craft knife with a sharp blade
- Paper trimmer
- Glue gun and glue sticks
How to:
- Paint the foam wreath in red. Leave it to dry.
- Cut ten five inch squares from the scrap paper.
- Mark the two and a half inches line from the corner of the paper square towards the center.
- Use the ruler and knife to cut the paper square along these lines.
- Now bring the left corner of the sides to the center and secure with the glue gun.
- Punch ten half-inch circles from the cardstock paper.
- Glue the pinwheels to the wreath side by side.
- Glue the ribbon ends to make the loop and then glue the loop to the back of the wreath. This is an easy, fun craft for teens to make.
3. CD Fish
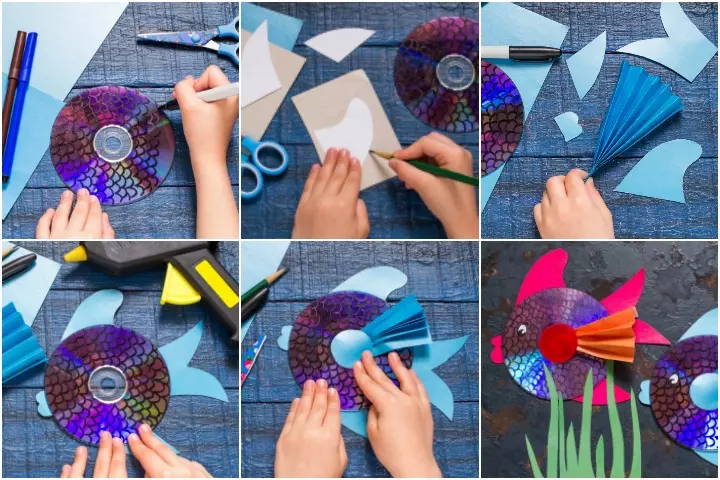
Compact Discs or CDs are almost obsolete now. Very few use them, and your teen is certainly not among them. So what do you do with all the old, unwanted CDs? We think ‘a fish’ is a good idea!
You will need:
- Compact disc
- Craft paper
- Thick sheets of paper (should be able to fold)
- Scissors
- Glue
- Markers
How to:
- Start by drawing fish scales on the blank or unprinted side of the CD.
- On the thick sheet of paper, draw fish tails, and fins. Use scissors to cut them into shape and set aside.
- Accordion-fold the craft paper, in the form of a fan.
- Glue the fins, fish tail to the CD as shown in the image.
- Glue the folded craft paper to the center of the CD and cover it with a small round, cut from the same craft paper.
- Spread the folded craft paper like in the image. Add an eye made of white paper, and your fish is ready.
4. Sticky Note Pad Holder
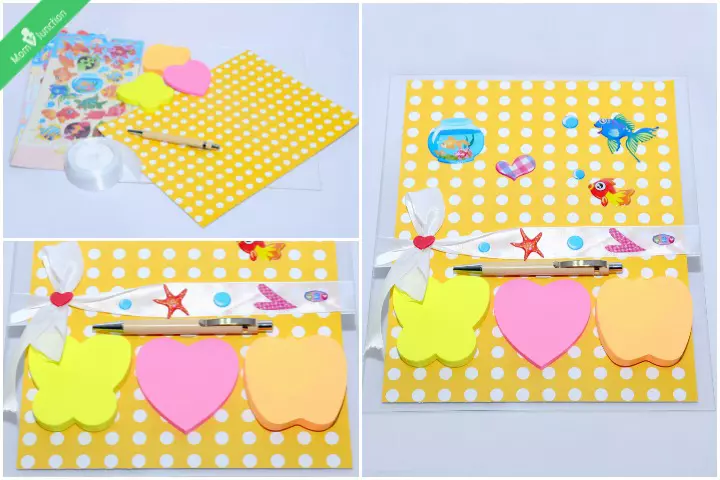
Notepads and sticky notes are very handy. So here is a cool craft of organizing the sticky notepads in one place.
You will need:
- Sticky note pads, any color, and shape
- Polka dot wrapping paper
- Picture frame or plain cardboard
- White satin ribbon
- Stickers
How to:
- Stick the polka-dotted sheet to the cardboard.
- Place it vertically on the table and tie a white satin ribbon around it, in the middle. You can deck the ribbon with tiny stickers.
- Below the ribbon, place the sticky note pads, any way you like.
- Decorate the top end with stickers and your sticky notepad holder is ready!
- You can punch a hole at the top of the pad and tie a string or ribbon to hang it.
 Be watchful
5. Mason Jar Candle
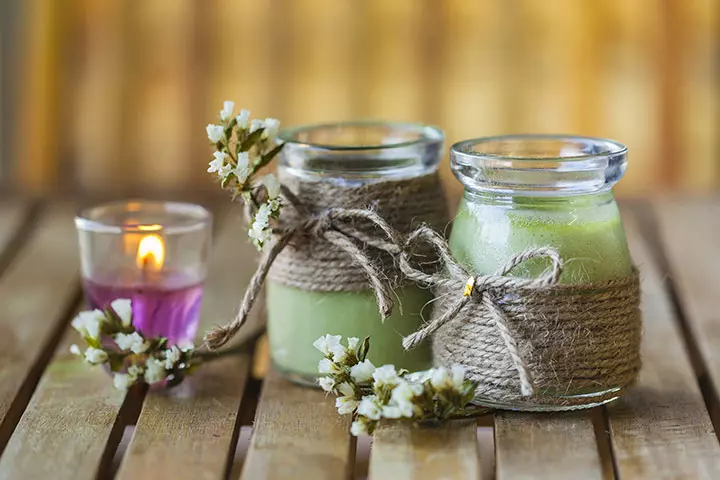
Unlike traditional pottery using clay or ceramics, Mason jar candles are easy to make and also look perfect on the center table. Here is how you can make decorative mason jar candles in different colors.
You will need:
- Mason jars
- Colored wax flakes
- Candle pouring pot
- Wooden spoon
- Wick holder sticks and stickumsiAny gummy, sticky, or adhesive material
- Long candle wick (should be as long as the height of the jar)
- Scent or aromatic oil (optional)
How to:
- Clean the inside of the mason jars dry.
- Take the wicks, straighten them out, and stick ’em to the stickums.
- Place the wicks in the center of the jar, (stickum-side down) such that they stand straight as a stick.
- Use two wick holder sticks to keep the wick in place when you pour the melted wax. The sticks will be above the jar.
- Melt the wax in the candle pouring pot: you can melt one color at a time.
- Use the wooden spoon to stir the wax as it melts. Add a drop of scent or oil and stir it again.
- Once it is properly melted, take it off the heat and let it stay for 20 to 30 minutes or until the temperature reaches between 120 and 140 Fahrenheit.
- Pour the melted wax into the jars carefully, without pouring it on the wick, to provide an aesthetic appearance similar to sculpting.
- Let it cool, and your candles are ready.
6. Mod Podge Journal
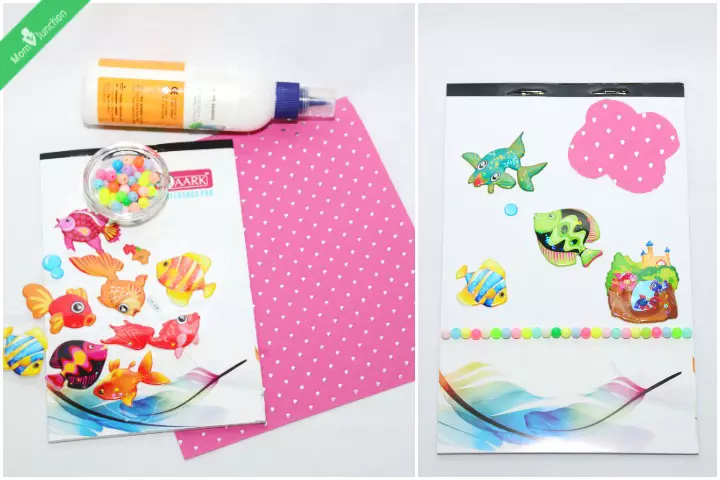
Can you get your teen to share all the secrets she puts down in her journal with you? Impossible! But you can get them to decorate their special book. Here is how.
You will need:
- A journal or a notepad
- Words, phrases, stickers
- Glue
- Paintbrush
- Scissors
How to:
- Cut your choice of words and phrases from magazines or newspapers using the scissors.
- Apply glue over the notepad. Use a paintbrush to ensure the glue is evenly applied.
- Stick the pictures, phrases, and words as you like. Alternatively, you can stick animal shapes, pieces of cloth, and beads on the notebook cover.
- Let it dry, and your Mod Podge journal is ready.
 Do remember
7. Easy Button Heart
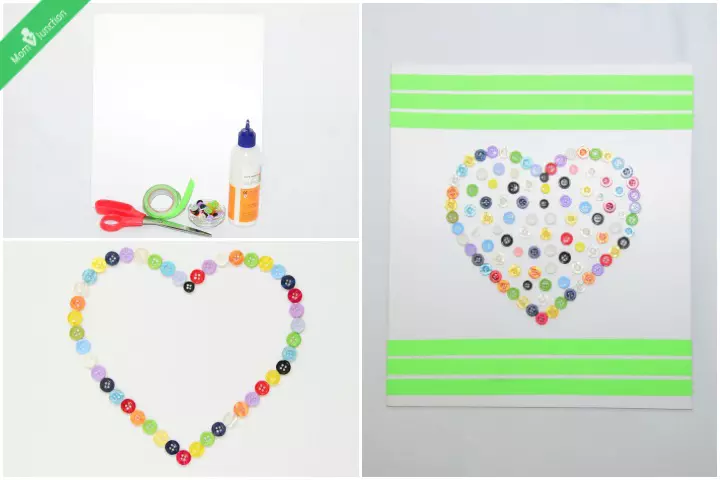
Colorful buttons can do more than just hold a piece of cloth together. If you have a lot of old buttons or buttons from old clothes that you do not need, you can use them to create art.
You will need:
- 8×10 inches canvas or cardboard
- Buttons
- Glue
- Tape
- Scissors
How to:
- If you are using a canvas, paint it white. Otherwise, use a white cardboard sheet.
- Decorate each vertical end of the canvas with the green tape – stick three lines of tape on each side, leaving enough space to make the heart in the center.
- Draw the outline of a heart in the center.
- Glue the outline with buttons, as seen in the picture.
- Fill the heart by gluing the remaining buttons.
Easy-peasy!
8. Flower Crown
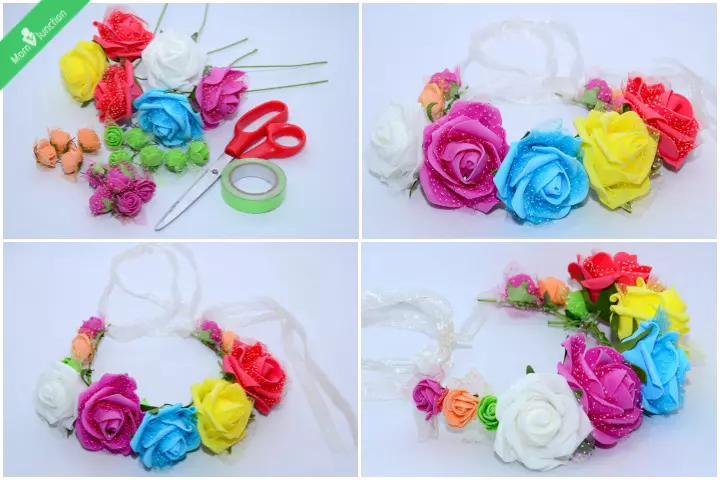
Hand-made flower crowns are great accessories one can wear to a wedding, prom, or for summer parties. This can be a fun project to do at home for teenagers. Here is How to make them in simple steps.
You will need:
- Selection of colorful artificial flowers
- Florist’s wireiThin, flexible aluminum wire is utilized in flower arrangements or flower crafts
- Tape
- Ribbon
- Scissors
How to:
- First, create a crown to fit your head. Use a ribbon to measure it: ideally, it should be around seven to nine inches in length.
- Cut the stem, leaving just an inch of the faux flowers and attach the flowers using a thin wire. Alternatively, you can also knot the stems of the flowers to attach them together.
- Arrange the flowers such that the bloom is to one side.
- Use the tape to secure the knots.
- Tie the two to three inches long lace at each end of the crown.
- You are ready to be the flower princess!
9. Christmas Wreath with Red Berries
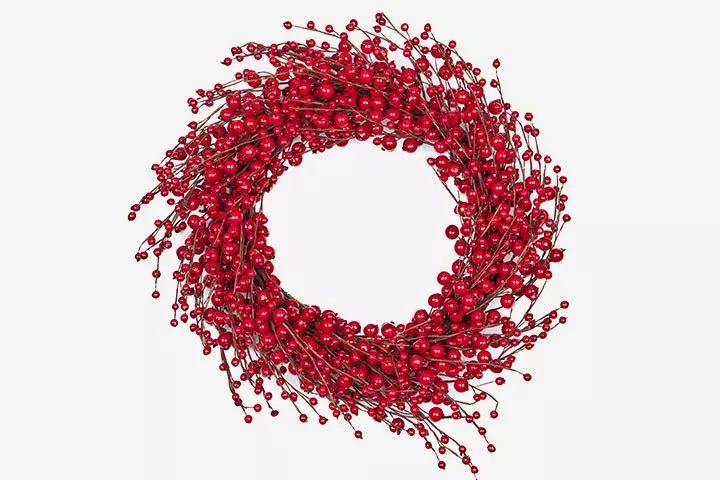
This wreath is for the holidays and made from sweet, reddish berries.
You will need:
- Around 40 winterberry branches, each ten to 16 inches long
- Green florist’s wire, 16 to 18 inches long
- Glue gun
How to:
- Start by creating a wreath frame using the florist’s wire.
- Join the longer winter berry branches with the florist’s wire one at a time, and overlap them as you make a circular wreath.
- Use the glue gun to secure the wire and the branches together. You can also use tape for this.
- Once the base is ready, attach the shorter branches to make the wreath look full.
10. Woolen Heart
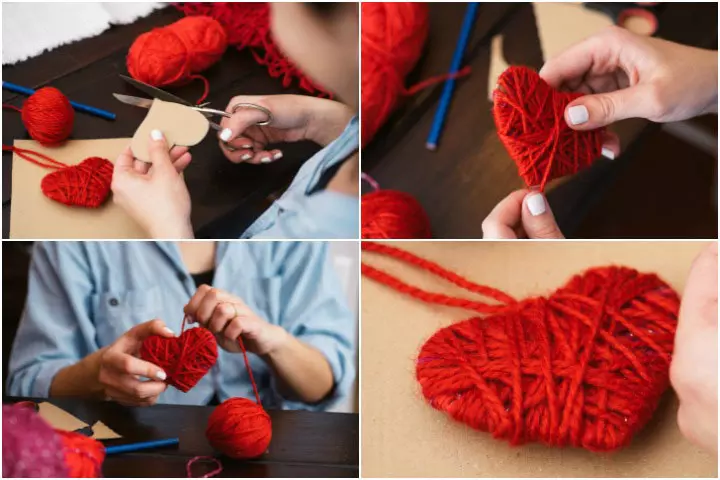
This can be a cute Valentine’s Day gift that your boy or girl can make at home. A ball of yarn and a little time is all you need to make this gift.
You will need:
- Ball of red yarn
- Scissors
- Cardboard
How to:
- Use a pencil to draw the outline of the heart. You can make as big a heart as you want. Just make sure you have enough yarn for it.
- Start by wrapping the heart with the yarn. Cover it completely until you get the desired size or the wool is completely used.
- Tie the loose end of the yarn to the other strings in the heart. You can also leave some yarn to make a handle or string for hanging the heart in your vehicle.
11. DIY friendship bracelets
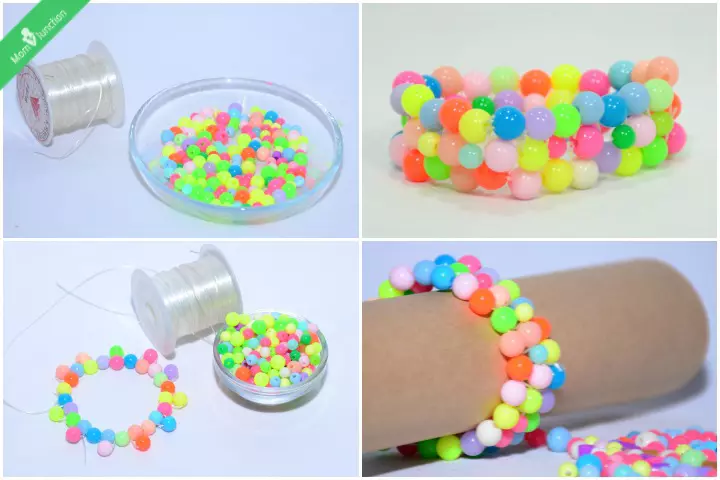
Making bracelets is an engaging art and craft for teen girls. So, this year, let your teenager make friendship bracelets instead of buying them. After all, a hand-made gift is more valuable than a store-bought one!
You will need:
- Colorful pony beads
- String, thin enough to go through the beads
- Scissors
How to:
- Cut the string to the desired length. It should fit the person’s wrist, but should not slip away either.
- Start threading beads of different colors to form a single line bracelet. Knot the ends together to prevent the beads from falling. One end of the knot should be longer than the other.
- Start with the second row by starting at the ending point of the first row. Using simple crocheting techniques, intertwine the thread through the first circle and place each bead between two beads of the first row.
- Once done, secure the beads with a knot.
- Make another row in the same manner, and the bracelet is ready.
 Did you know?
12. Flower Mirror
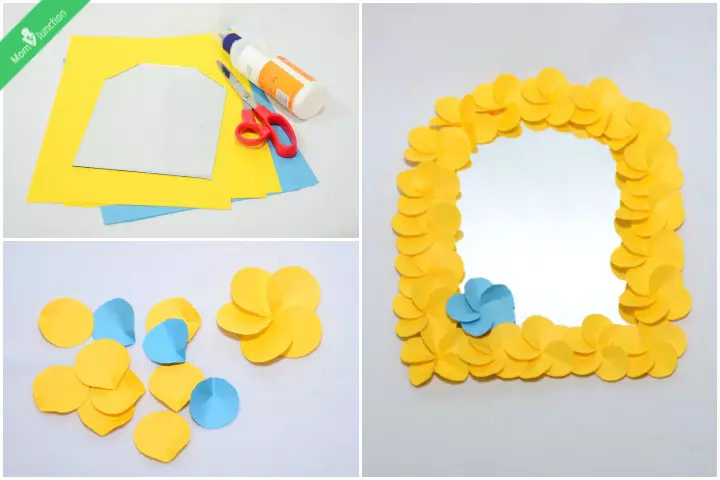
Art need not be expensive. When you take everyday things and make them pretty – that’s art too. Here is one such arts and crafts project for teenagers we have lined up for you.
You will need:
- Color paper (yellow and blue)
- Mirror
- Glue-word
- Scissors
How to:
- Use a craft paper punch to create petals as shown in the figure. You can also draw an outline of the petal and cut it out. In any case, the petals should be of the same size.
- Fold one third of the petal from the pointy or sharp side to give it a slight curve. The petals should look as shown in the image.
- Glue five petals together, by joining the pointy edges with glue. Make as many such flowers as you need.
- Stick the flowers to the sides of the mirror, and let it dry.
13. Pine Cone Ornament
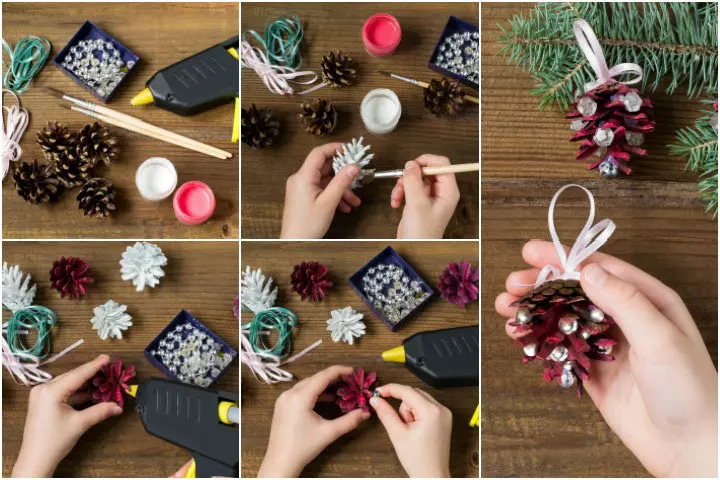
Add a little more color and taste to your Christmas tree this year. Make the ornaments yourself! Here is How to use fallen pine cones to make colorful Christmas decorations.
You will need:
- Pine cones
- Water paints – maroon and white
- Paintbrush
- White ribbon
- Iridescent micro beads
- Glue
How to:
- Paint the tips of the pine cone with maroon or red color water paint. You can paint some in white as well.
- Paint one side of the cone and let it dry before painting the other side.
- Use glue to attach the beads to a few edges of the cone.
- Tie the white satin ribbon to the top of the pine cone. Create a loop with the ribbon so that you can hang the ornament on the tree.
14. Washer Necklace
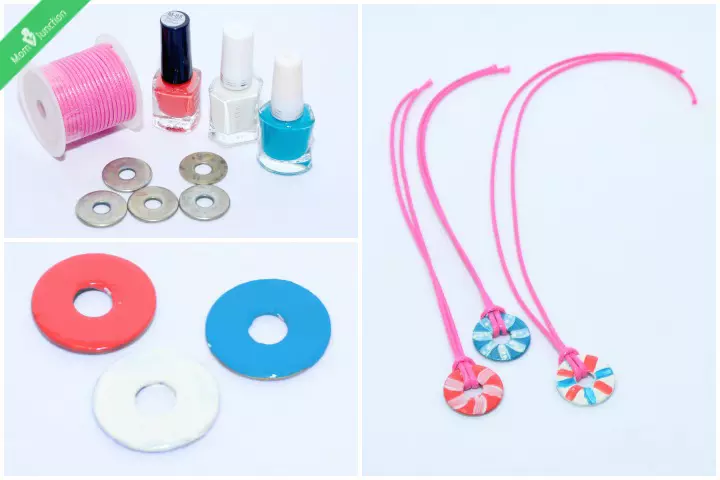
A little creative thinking and you can create really cool crafts from ordinary things. In this tutorial, we will tell you how a washer (plumbing) can be used to make a cool necklace.
You will need:
- Washers, buy at a plumbing store
- Thread or cord
- Nail varnish – get different colors, and some glitter as well
How to:
- Paint one side of the washer with the nail varnish and let it dry. Paint the other side and let it dry.
- Use the glitter to decorate the washers as you like. You can also create designs using a different color varnish. If you paint the washers blue, use white stripes for design.
- Cut the thread or cord of the desired length and tie it to the decorated washers.
15. Snow Globe
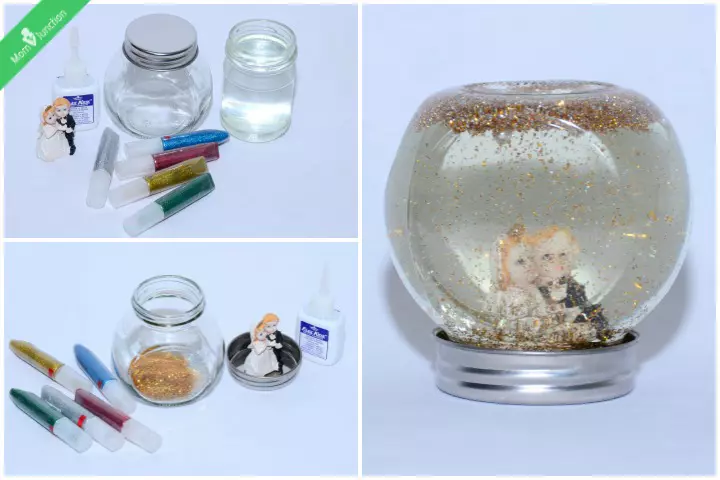
Unlike glassblowing, making a snow globe is more straightforward than it appears. We will show you how to do this simple art project with a quick tutorial!
You will need:
- A glass jar with lid (preferably one that is round)
- Glitter, lots of it
- Water
- Water-resistant glue
- A small figurine
How to:
- Pour all the glitter into the jar, let it settle at the bottom.
- Pour the water into the jar; fill it to a little below the brim.
- Stick the figurine to the inside of the lid and let it dry.
- Apply glue to the edges of the lid and cover the glass jar.
- Turn it upside down, and let it snow!
 Quick tip
16. Balloon Bowls
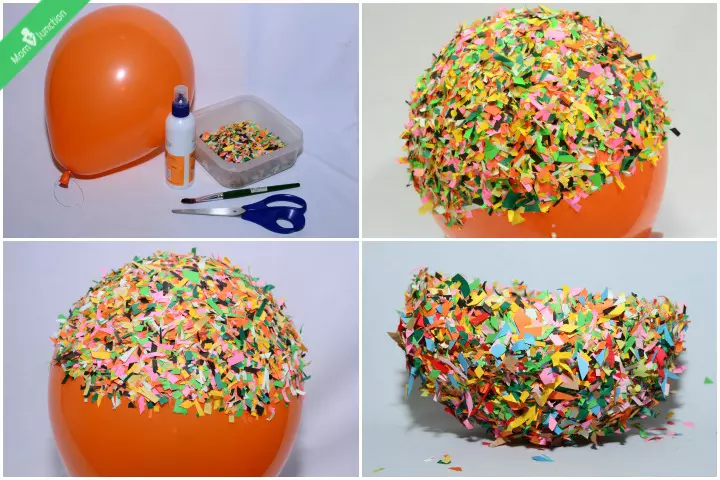
No. The balloon bowls are not made of balloons. Read on to learn how to make a balloon bowl, not made of balloons!
You will need:
- A large balloon
- Confetti
- Glue
- Paintbrush
- A round container, like a pie or a cake pan
How to:
- Blow up the balloon and tie it up. Put it in a bowl to keep it still.
- Apply glue to the bottom of the balloon and spread it generously using a paintbrush.
- Sprinkle confetti all over the glued portion of the balloon. You can take it out of the bowl and add confetti to the sides.
- Put it back in the bowl and let it dry.
- Add some more glue on top of the confetti and add more confetti. Repeat the steps three or four times more.
- Make sure that there are no gaps between the confetti or you’ll end up with a bowl with holes.
- Once it is dry, pop the balloon and cut the edges to make it even.
17. Enamel Spoons
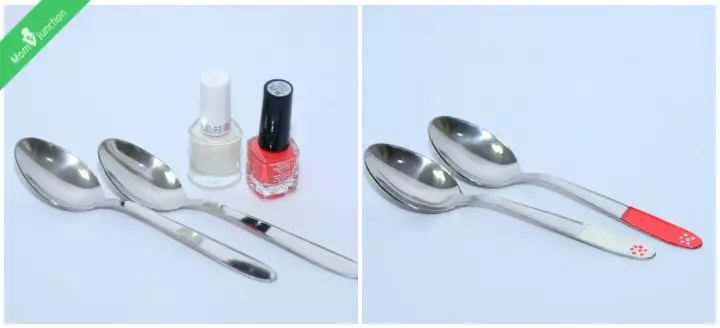
Enamel spoons are easy to create. Because all your teen would be doing is painting the spoons (not manufacturing real spoons!).
You will need:
- Two stainless steel spoons, with smooth handles preferably
- Nail enamel paint
- A paintbrush
How to:
- Paint the end of the handle with a bright enamel paint. Let it dry.
- Apply another coat of paint and let it dry too. You can add another layer as well.
- Use a lighter color to design it. You can also apply crackle paint on the initial coat of paint for a unique design.
18. Paper Mache Pots
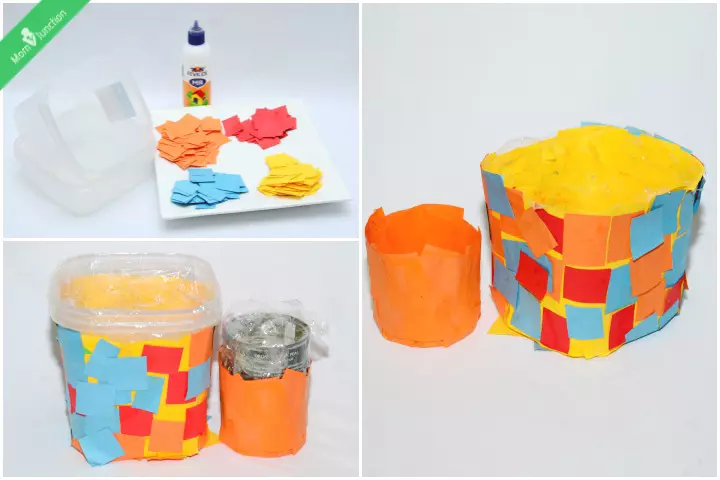
This is similar to the balloon bowl or string bowl, except here, you will be using paper to create uniquely shaped bowls, cups, and more.
You will need:
- Colorful paper, or magazine papers
- Boxes, bowls, and cups to act as mold
- Craft glue
- Water
- Plastic food wrap
- Masking tapeiA pressure-sensitive and non-marking tape composed of paper that is thin and easily torn
How to:
- Cut the magazine papers into small squares, triangles, and other shapes you like.
- Prepare the base by wrapping the food plastic around one of the containers or bowls you want to use as a mold. You can secure it by sticking it to the bowl at the top with masking tape.
- You can make the glue a little runny by adding just a little water.
- Turn the container upside down and apply the craft glue over the plastic wrapping and stick the paper pieces.
- Continue sticking the pieces of paper to cover the plastic wrapping, but not on the masking tape.
- Leave it to dry completely. Once it is done, remove it from the mold and the plastic inside it.
The paper mache pots are ready!
Unique Art Ideas For Teenagers To Try
So far, we have made things with things. That was craft.
Now is the time to get a little artsy, using crayons, paints, and whatnot! Keep reading for some interesting tricks and techniques to create beautiful art.
19. Crayon Art
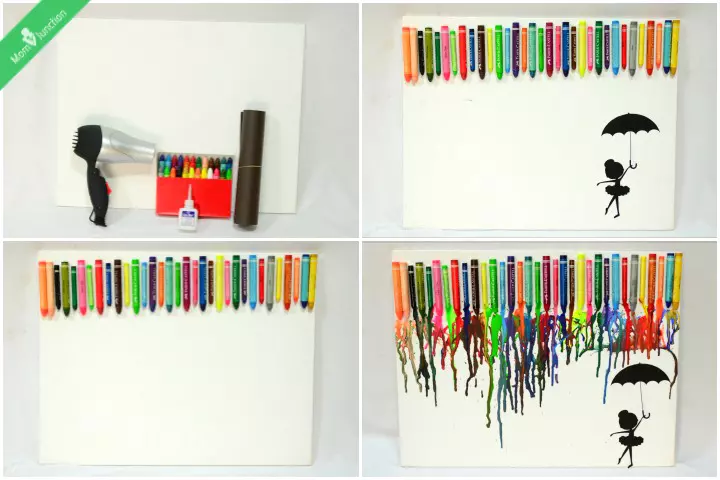
As a child, your teen may have scribbled the crayons until they melted away on paper. This tutorial will teach them to melt the crayons in a different way, to create a work of art!
You will need:
- A blank canvas
- A pack of crayons
- Hot glue gun
- A cup
- A blow dryer
- Silhouettes of your choice
- Scissors
How to:
- Lay the white canvas horizontally.
- Apply glue with the hot glue gun and stick the crayons as shown in the image.
- Stick the same shades of crayons together and let them dry. You could also mix up the colors if you want.
- Cut the silhouettes and stick them at the bottom of the canvas.
- Cover the top of the silhouette with the cup.
- Holding the cup with one hand, use the blow dryer with another to melt the crayons.
- Melt the crayons enough to give the impression of a rainy day.
- Let it dry before you hold it vertically.
20. Monogram Wall Art
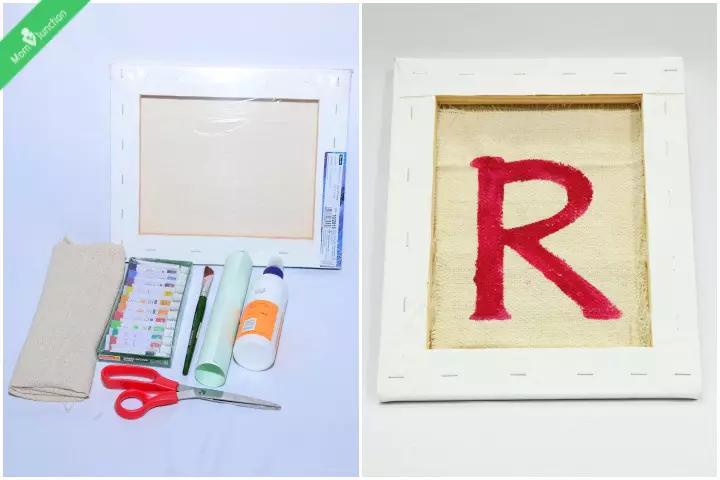
A teenager’s room is private. They do not like any intrusion and can lose it if they find you or anyone trespassing. So here is a fun way to let them mark their territory! No, it is not what you are thinking. We are talking about a monogramiA sign that is typically created by joining the initials of a person's name with their initial!
You will need:
- A thin piece of cloth, big enough to be framed. You can choose a thin cotton cloth or go for a grainy linen material.
- Fabric paint
- Paintbrush
- Printout of the monogram
- Scissors
- Glue
- A marker or pen
- A cardboard frame
How to:
- Place the material on the printed monogram and use the pen to trace it on the cloth. Yes, that is why we wanted a thin, almost transparent material. You can use your creativity to draw the letter in various styles, such as calligraphy.
- Once that is done, fill the inside of the letter with any color you want. We chose red.
- Coat the letter at least twice to give it a good color.
- Let it dry before attaching it to the frame.
21. Cutting Board Decorations
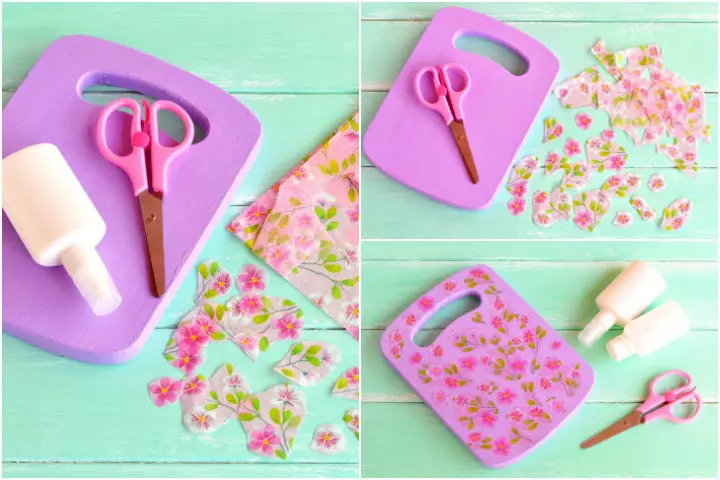
Your teen may not be very keen on helping you out in the kitchen. But you know what they might be interested in? Turning something ordinary into something beautiful. Like the cutting board, maybe?
You will need:
- A wooden cutting board, preferably lilac
- Floral paper napkin
- Glue
- Scissors
- Paintbrush
How to:
- Take a floral paper napkin and cut segments out of it, as seen in the image.
- Clean the cutting board to remove any dirt.
- If you have a brown, wooden cutting board, you can paint it lilac. Let it dry.
- Glue the paper napkin segments on the cutting board, in any way you like.
22. Marbled Milk Paper
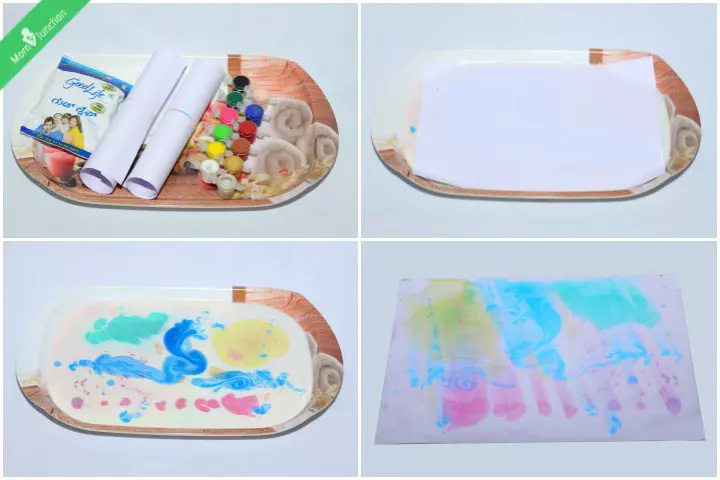
Whoever said it is art only if you think of something and then paint or draw or sketch it on paper? You can create art by playing around with elements too. In this case, it will be milk, paper, and paints.
You will need:
- Milk
- Watercolor papers
- Liquid colors
- Shallow dish or tray
- Toothpick or Q-tips
If you are not comfortable using milk and deem it as a waste to use it this way, then use milk you might otherwise throw away. Or you could try this as an extension of the magic milk experiment.
How to:
- Pour the milk into the tray.
- Mix the watercolors and add a few drops to the milk.
- Slowly mix the milk using the toothpick or q-tip.
- Let it settle. Place the sheet of paper on top of it and leave it for a few seconds.
- Remove the paper carefully and let it dry.
- Once the design changes, you can get it on another paper.
Get as many designs as you can with one pack of milk and a little color. It is an excellent way to create abstract art.
23. Oil and Water Droplet Painting
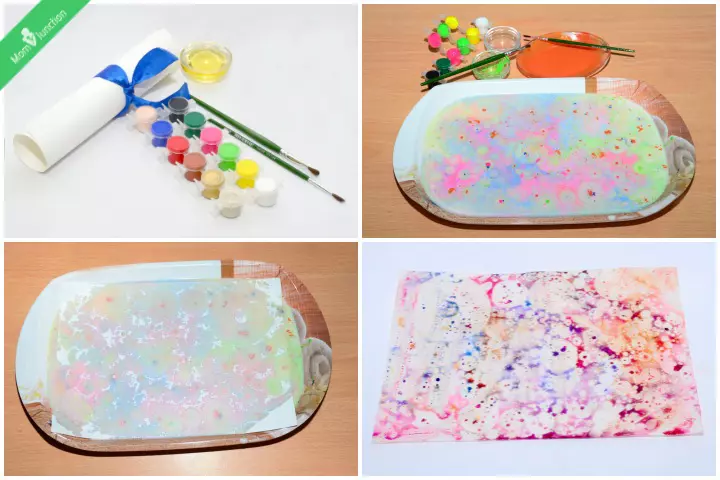
Here is another way of creating art with liquids. All that your kid needs to do is bring them together.
You will need:
- Watercolor paper
- Watercolors
- Water
- Cooking oil
- Paintbrush
- Tray or shallow dish
How to:
- Pour some water into the shallow dish or tray.
- Mix a few drops of oil in the water, use an eye dropper for the job. Be careful not to add too much oil. Because then the paper will only absorb oil and not colors.
- Add the watercolors to this mix using the eye droppers.
- Lay the sheet of watercolor paper on the surface and remove it after a few seconds.
- Put it on a rack to dry, the painted side up.
24. DIY Wall Art
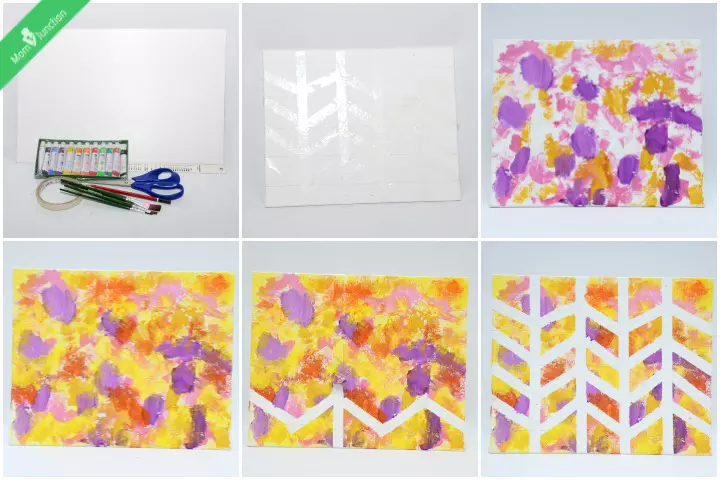
Decorating your teenager’s room with art they created on their own is a moment of pride for you, and also your child. You need not be a professional to create masterpieces. Here is how your teen can create impressive wall art with simple materials.
You will need:
- Canvas board
- Painters tape
- Pencil and ruler
- Acrylic paints
- Paintbrushes
How to:
- Prepare the canvas. Use a ruler and pencil to mark the design. Here, we used the basic chevron design.
- Mask the design using the painter’s tape, which should not be more than an inch thick.
- Use acrylic paints, a mix of different colors to create abstract designs. You can use the paintbrushes and also play around with finger painting.
- Once you fill the canvas with colors of your choice, let it dry.
- Remove the painter’s tape slowly, and you have the finished product.
25. Paint Chip Art
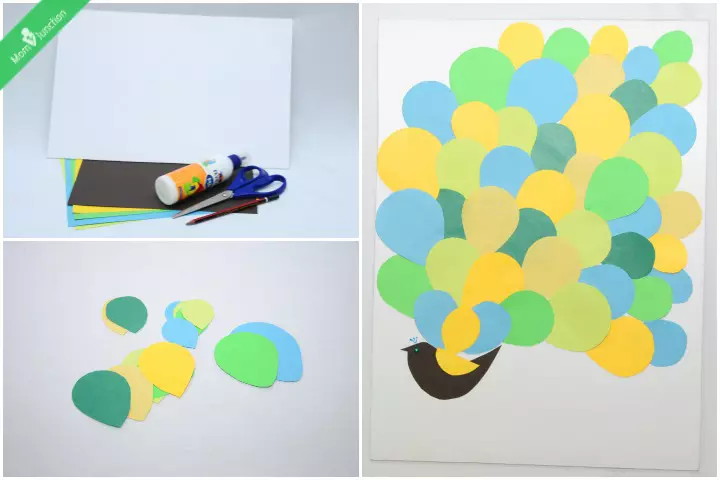
An interesting way to create art is to arrange paint chips in a variety of designs. Here is one that can teach your child to be patient, to get the desired results. This productive activity for teenagers is a great way to unleash their creativity and express themselves without constraints.
You will need:
- Scissors
- Paint chips in different colors
- Black craft paper
- White card stock paper
How to:
- Cut out feather shapes from the paint chips. Your teen can make it in the same size or different sizes.
- Trace and cut out a little bird of the black craft paper.
- Glue the bird on the right end side of the paper and draw the legs and crown of the peacock.
- Now apply the glue on the feather area and arrange the feathers on it. The feather should be full, not sparse.
26. Graffiti Name Art
Graffiti name art will certainly appeal to the creative mind of your teenager. They might be excited to see their names take vibrant forms through graffiti art.
You will need:
- Colored alcohol markers
- Pencil
- White craft paper
How to:
- Write your name on the white paper in capital letters and straighten all the curves.
- Draw an outline for each letter, adding a pointy end at the top and bottom.
- Now add an outline to the whole word and add pointy ends.
- Fill color inside the letters as you like (you may add multiple colors of your choice).
- Draw bricks as a background (by drawing horizontal and vertical lines) of your name to give a graffiti look.
- Use light gray as the base color for the bricks and outline each brick with dark gray pencil.
- Use the same pencil to darken the outline of your name.’
Safety Tips For Teens Doing Arts And Crafts
The opportunity to use advanced art supplies and create intricate crafts can be incredibly exciting for a teenager. Plus, the sense of accomplishment that comes with completing a detailed project can boost confidence and encourage further artistic growth. However, amid all the fun, it’s important for teens to stay safe. Here are some safety tips for teens doing arts and crafts.
- Use non-toxic art supplies. Look for products with a statement of conformance, such as “Conforms to ASTM Practice D-4236,” recommended by the United States Consumer Product Safety Commission (2).
- Follow the instructions on the materials you use.
- Keep materials and workspace organized to prevent spills and accidents.
- Be cautious with small parts, such as beads, buttons, or pins, as they can pose a choking hazard.
- Wear protective clothing and equipment, including safety glasses, gloves, and an apron.
- Use scissors, knives, or cutting tools carefully. Keep fingers away from blades and cut in a controlled direction.
- Create art in a well-ventilated area to avoid inhaling fumes.
- Store art supplies, especially chemicals or sharp objects, out of reach of young children and pets.
- Keep a first-aid kit nearby and be familiar with first-aid steps for common injuries.
- Take breaks to stretch and rest your eyes to avoid strain and exhaustion.
Frequently Asked Questions
1. How can parents support their children’s interest in arts and crafts?
Parents can help develop their child’s interest in arts and crafts by encouraging their creativity, offering positive feedback, and displaying their work in front of others.
2. Can working on arts and crafts projects help reduce stress?
As per a study, engaging in creating arts and crafting significantly predicted increased life satisfaction, a sense that life is worthwhile and happiness (3). It might also help boost self-esteem, distract oneself from negative thoughts, and reduce feelings of anxiety and depression, in turn reducing stress.
3. What are the benefits of arts and crafts projects for children’s cognitive development?
Arts & crafts projects have various advantages for children’s cognitive development. They foster innovation, imagination, problem-solving, and critical thinking abilities. These activities also improve fine motor skills and hand-eye coordination (4) while also allowing teens a way for self-expression.
4. In what ways do arts and crafts projects encourage problem-solving and critical thinking?
Arts and crafts projects teach problem-solving and critical thinking by providing children creative challenges and decision-making opportunities. They challenge children to make decisions regarding materials, colors, and patterns and develop solutions when facing obstacles.
5. How can arts and crafts projects help individuals develop patience and perseverance?
Creative projects require persistent effort, deep focus, and attention to detail. These projects often involve numerous steps and tedious tasks such as painting or elaborate development that help develop patience and perseverance.
6. How do arts and crafts projects impact social and interpersonal skills?
Children learn to collaborate, communicate their ideas, and listen to others when participating in group art activities. Being one of the best fun activities for teens, arts and crafts projects promote interaction with others, improving the child’s social skills. Additionally, as per an evidence brief by SBB Research Group indicates that teenagers who participated in arts groups between the ages of 12 and 19 used substances less frequently (5).
To be able to make art, your child does not need to be as talented as Van Gogh or Monet. They can be themselves while working on a creative art project. Encourage your children and teenagers to try these arts and crafts projects described above, and work with them if necessary to help them develop their creative abilities. Once their work is complete, display them in your living room or give them to someone as a gift to inspire your kids to make more of them. They’ll soon be able to come up with more brilliant ideas independently. Some advanced skills like jewelry making, metalworking, or woodworking require mastering the basic knowledge of arts and crafts.
Infographic: Simple Arts And Craft Activities For Teens
Indulging in arts and crafts is a great way for teens to take a break from academics, let their creative juices flow, and interact with their peers. So, we bring you some exciting and easy DIY craft ideas you may suggest to your teen and also try with them.
Some thing wrong with infographic shortcode. please verify shortcode syntax
Illustration: Creative And Easy Arts And Craft Ideas For Teens
Image: Stable Diffusion/MomJunction Design Team
From room decor to phone cases, there’s something for everyone! Check out this video for some DIY inspiration.
References
- The art of creating: Why art is important for early childhood development.
https://www.canr.msu.edu/news/the_art_of_creating_why_art_is_important_for_early_childhood_development - Art Materials.
https://www.cpsc.gov/FAQ/art-materials - Helen Keyes et al.; (2025);Creating arts and crafting positively predicts subjective wellbeing.
https://pmc.ncbi.nlm.nih.gov/articles/PMC11361946/ - Use of Art/Art Work and Cognitive Skill for the Rehabilitation of Special Children of 4-9 Years of Age.
https://files.eric.ed.gov/fulltext/EJ1137145.pdf - Evidence brief: how the arts can support children and young people’s development and wellbeing.
https://sbbresearch.org/wp-content/uploads/2025/03/SBB-Evidence-Brief-Arts-and-young-people.pdf - Choosing Safe Art & Craft Supplies for Children.
https://www.healthychildren.org/English/safety-prevention/at-home/Pages/Choosing-Safe-Arts-and-Craft-Supplies.aspx
Community Experiences
Join the conversation and become a part of our nurturing community! Share your stories, experiences, and insights to connect with fellow parents.
Read full bio of Erin DeCarlo
Read full bio of Harshita Makvana
Read full bio of Deepa Thomas
Read full bio of Vaswati Chatterjee


