
Image: Shutterstock
Children love bright colors and artistic activities. So, we are here with some painting ideas for kids to help develop their motor skills, thinking abilities, and imagination. Many therapists believe that painting can help children express their deep emotions. At home, art helps children stay engaged and develop strong bonds with others. Coming up with innovative ways to involve children in art is not difficult. You need some paints, simple materials, free time, and lots of creativity. However, if you struggle with finding new painting ideas, this post has compiled a list of some of the best ones that need little preparation time and are fun.
 Quick fact
Key Pointers
- Painting nurtures children’s emotional expression and improves motor, thinking abilities.
- Art activities engage children and enhance their social connections.
- Creative art projects for kids are easy with basic supplies and some imagination.
- Painting together can reveal unknown interests and thoughts of children.
- Fun painting ideas for kids include handprint art, tie-dye paper, tape resist flower painting, and spin art.
20+ Creative Painting Ideas For Kids
Your child doesn’t need expensive paint or drawing instruments for painting. They can also do it with a simple car to create interesting art. Lavanya, a mother of two lovely daughters whom she calls Miss A and Miss D, shares her children’s experience using toy cars to paint. After a fun painting activity session, she says, “This was a great activity for A to talk about thin and thick lines. She liked to make tracks on one stroke and tried to paint one over the other to see how it looked.
“She then joined D and made tracks on the same sheet – some messy sibling fun. D liked this activity a lot…Later, Dad joined us, and I must say Dad seemed to like it more. Overall, it was a fun evening activity (i).”
So, if you also want to encourage your children to paint, check out this interesting collection of painting ideas.
1. Fall leaves with coffee filters and hot glue

You Will Need:
- A few coffee filters
- Hot glue
- Watercolors
- Paint brushes
- A pair of safety scissors
- A pencil
How To:
- Help your kid by sketching the outlines of leaves on the coffee filters and help them cut out on the outlines.
- Let your kid make the lines on the leaves using the hot glue.
- Set the coffee filters aside till the glue has completely dried.
- Now help your kid color the coffee filter leaves using the water color shades of his choice.
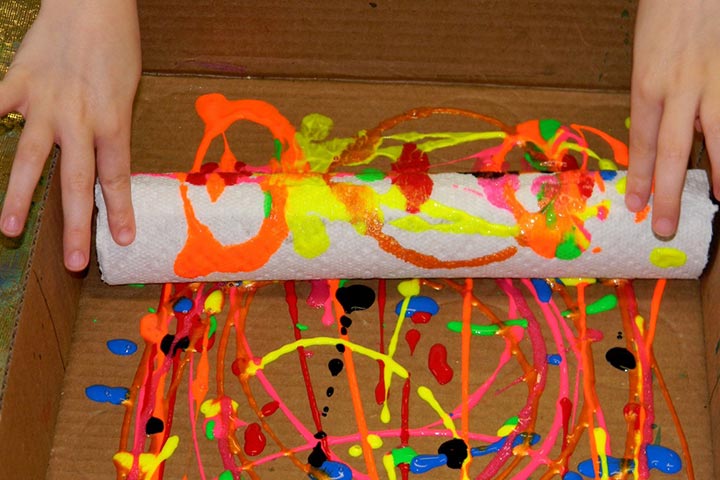
2. Paper towel tube print hanging wall décor
You Will Need:
- Empty paper towel tubes
- A paper towel each for the empty paper towel tubes
- Paints in different shades
- An old cardboard box
- Glue
- An old paintbrush to apply the glue
- Cord or ribbon – optional
How To:
- Help your kid by layering the empty paper towel tube with glue. Place the paper towel on the paper towel tube and help your kid cover it up.
- Let your kid squirt the paints in the cardboard box. Choose one that is shallow, as it will make it easier for your kid to roll and paint. Encourage your kid to make lots of interesting and bold color choices that will make the print look even prettier.
- Once done, ask your kid to place the covered paper towel tube on one side of the cardboard box. Next, ask your kid to roll it from over the colors to the other side of the cardboard box. Your kid will love seeing the colors mix and match on the tube and make unique patterns.
- Once done, put up the printed paper towel tubes to a side to dry. You can hang them up using cords or ribbons to create a pretty printed wall décor.
Isn’t this an amazing kids painting idea?
3. The very hungry caterpillar handprint art
You Will Need:
- A cardboard sheet or paper on which you want to make the art
- Paints and paintbrushes
- An A4 sheet of construction paper in orange
- Craft glue
- A bucket of soapy water and an old towel to clean up
- Disposable paper plates
How To:
- Help your kid pour out the paint on the paper plates. Green paint for the body of the caterpillar, blue for the legs and red for the head.
- Let your kid put his palms in the green paint and press the handprints on the paper. Next, ask him to put his fingers in the blue paint and make the legs under the green body.
- Your kid may need to make up to four hand prints for the body of the caterpillar.
- Your kid can make the head using red paint and use black paint to make the antennae and the eyes and nose.
- Use the orange construction paper to make the body of a butterfly and use the same hand printing technique to make the wings and antennae.
- Your kid can also make some additional designs on the artwork. It is an amazing art painting idea for kids.
4. Making the fridge colorful

You Will Need:
- Eggs from the fridge
- Some art supplies like painting colors and a paintbrush
How To:
- Set up your kid on the dining table with the carton of eggs and a pack of painting colors and paint brushes.
- Ask your kid to color the shells of the eggs in different colors and designs of his choice.
- Ask him to also be careful so that the eggs do not break.
- Once they are done, your kid can help put the eggs back in the fridge, adding a dash of color inside.
 Quick tip
5. Crayon painting project

You Will Need:
- Lots of crayons in different colors that your kid can use to melt and paint
- Marble tiles in square
- A Sharpie marker in black that you can use on the tiles
- Something to help scrape the color with, maybe old paint brushes
How To:
- Ask your kid to make different designs on the tiles using the black sharpie marker.
- Once that is complete, ask your kid to place the crayons on top of the drawing, based on what color he wants to use where.
- Help your kid to place the tile in the oven and heat it till you can see the crayons have started to melt. Let it heat for some more time.
- Once you see that the crayons have melted, very carefully take out the tile from the oven. Make sure you or an adult does this step as it can cause serious injuries to your kid if he does it on his own.
- Warn your kid that the tile is hot. Place it on a towel on a sturdy surface.
- Help your kid to spread out the melted crayons and paint them with the help of the scraper or the old paint brush.
6. Smiley face painting on wooden plaque

You Will Need:
- A wooden plaque
- Some poster colors
- Some paint brushes
- Magnetic tapes – optional
- A pair of safety scissors – if you are using the option of the magnetic tape
How To:
- Help your kid draw fun smiley faces on the plaques using different colored paints.
- Once your kid finishes painting the plaque, set it aside to let it dry completely.
- If you are using the magnetic tape, cut out a piece using the scissors and put it on the plaque to help stick it to your fridge as a magnet.
7. Salt and water color painting

You Will Need:
- A white chart or card paper or plain printer paper
- Watercolors
- Paint brushes
- Table salt
How To:
- Let your kid paint the paper in different colors using the watercolors to make the background.
- Make sure you keep the table salt ready and handy.
- As soon as your kid finishes painting the background, ask him to use the salt and sprinkle it over the watercolor to make a design of choice.
8. Drippy liquid watercolor paint

You Will Need:
- A white printer paper
- Watercolor paints in your kid’s favorite colors
- A paper towel
- A black Sharpie marker
How To:
- Help your kid drip the watercolor paints on the printer paper straight from the bottle. Now ask him to blot the extra colors using a paper napkin. If he can’t follow instructions, lead by example and show him how to do it.
- Once he is done, set the printer paper aside to dry.
- Once the painting is completely dry, ask your kid to draw over the paint. Tell him to use the black Sharpie marker. Tell him that the colorful background is the canvas, and he should sketch on it.
9. Ice cube painting

You Will Need:
- A large ice cube tray
- Watercolor paints
- Water
- Popsicle sticks
- White paper
How To:
- Let your child fill the ice tray with water and help them add a drop or two of different colors of watercolor paints to each compartment of the ice cube tray.
- Give them the popsicle stick to mix the paint and the water well. If they can’t do it, make sure you lend your helping hand and place the popsicle stick into each compartment so it sticks out of the top.
- Once done, allow it to freeze completely. Now, place a sheet of white paper and help your child to remove the ice cubes from the tray.
- Let them sit at room temperature for a few minutes and slowly glide across the white paper.
- Give some time to dry and explore some interesting patterns.
10. The painted heart stamps

You Will Need:
- An empty toilet paper roll
- Paints in different colors such as reds and pinks
- A plain white sheet of paper
- Disposable paper plate
How To:
- Take the empty toilet paper roll and press down both sides of its edges to bring them towards the center.
- The shape that you get by folding the edges inside will resemble a heart.
- Now help your kid pour out the paints on the paper plate.
- Ask him to dip the edge of the toilet paper roll with the folded heart shape and put as much paint on it as possible. Once your kid has picked up the color of the stamp, ask him to make as many imprints on the paper as he wants, even overlapping ones.
This is one of the beautiful painting ideas for kids’ bedrooms.
11. Spray bottle and watercolor fun

You Will Need:
- An empty spray bottle
- A blank white sheet of paper
- Any washable paint in a favorite color
- Some water
How To:
- Help your kid pour the paint inside the spray bottle and add some water. The resultant liquid should be a runny kind of colored water, ensuring that you add twice as much water as paint to get a similar consistency.
- Place the paper on an area where there is nothing that will get damaged with the paint, even though it is washable.
- Let your kid spray the paint from the bottle and make some fun and abstract art.
12. Painting with yogurt

You Will Need:
- Empty cans or small bowls in which you can mix the yogurt
- Plain yogurt
- Edible paint in colors of choice
- A plain sheet of paper or paper bags
How To:
- To begin with, teach your kid how to make some beautiful edible paint at home by mixing yogurt and edible paints. Ensure your kid mixes it properly so that there are no lumps or parts of white yogurt.
- Once the yogurt paint is ready, spread it out on the surface on which your kids will paint.
- Let your kids use their fingers to design and paint as they wish.
13. Drippy droopy watercolor art

You Will Need:
- Some water colors in your kid’s favorite shades
- Plain white sheets of paper in different sizes
- Water if required
How To:
- Place the sheets of paper on a plain and sturdy surface.
- If the water color mix is too thick, and not as runny as you need it to be, mix a little more water to make the mixture runnier.
- Ask your kid to get the watercolors drip out directly from the bottle and onto the paper. Now ask him to lift the paper, tilt it or blow it to let the watercolor move. As the paint will move, it will create more intricate and vibrant patterns.
14. Drippy watercolor flower art

You Will Need:
- Some liquid watercolors in colors of choice
- Some empty spray bottles
- Watercolor paper
- Liquid droppers
- A pair of safety scissors
- Water
- Glue stick
How To:
- Ask your kid to cut out different styles of flowers from the watercolor paper after stenciling them. The flowers have to be in big, medium and small size and can be differently styled.
- Once all the flowers are in place, ask your kid to spread them out on a flat surface.
- Let your kid now drop the liquid watercolors directly from the bottle on top of the water color paper. Your kids can use the liquid droppers to move around the watercolors on the paper or use their fingers to push them around.
- Once your kids add as many drops of water color to the mix, show them how to use the spray bottle to water the plants. As your kids will add water sprays, the watercolors will get absorbed in the paper and create beautiful patterns and shades.
- Once your kids are done spraying, set the flowers aside to dry completely.
- After the flowers are completely dry, ask your kids to sort them as per their size, such as big, medium and small. Now ask them to place the medium flowers on the center of the big ones and the small ones on the center of the medium ones to make the flowers. Glue them together in place.
- Keep the flowers as a memory. If you wish to add to the collection, follow the steps again.
15. Paint dot murals

You Will Need:
- Paint dots
- Butcher paper or plain white paper in a big size
How To:
- Instead of using the paint dots as just a tool to make dots, ask your kids to use them as proper paints and just start painting on the paper in whatever way they feel like. Let them do what they want to, and see how they go about it.
- If required, ask your kids to squeeze out the paint dots a bit to get more free-flowing paint.
16. Tie and dye paper towel art

You Will Need:
- Some pipettes
- Some liquid watercolors in favorite shades
- Some paper towels in the color white
How To:
- Pour the liquid watercolors in small disposable cups or bowls in which your kids can easily put the pipettes.
- Ask your kids to dip in the pipettes and fill them up with the liquid colors one by one.
- Let your kids drop the liquid water colors from the pipettes on the paper towels in such a way that they cover up all the white areas. Ask them to use as many shades as they want.
- Set aside the paper towels and allow them to dry before using them to decorate your art wall at home.
This can be a great painting idea for kids’ rooms.
17. Shell painting with watercolors

You Will Need:
- A few shells that your kids want to paint
- Some watercolors in your kid’s favorite colors
- A few paint brushes
- Some water
- A shallow tray or disposable paper plate
- Some table salt
How To:
- Ask your kids to cover up the shallow tray or the paper plate using the table salt.
- Now place the shells on the salt and bring along the water colors.
- Let your kids paint on the shells in any way and color pattern they want to.
- Once they have completed painting the shells, set them aside to dry and use later as you want.
 Point to consider
18. Pour painting using watercolors

You Will Need:
- Thick water color paper
- Painters tape
- A board that is larger than the paper you will be using and that will not be spoiled if the paint spills on it
- Water and paint brushes
- Watercolors or liquid water colors
- Spray bottle
- A bin in which your kid can catch all the dripping extras of watercolors
How To:
- Help your kid place the watercolor paper on the center of the board and tape it on all sides using the painters tape.
- Once the paper is secured in place, ask your kids to dip the paint brush in water and paint it all over the water, without using any paint colors.
- Ask your kid to cover the entire stretch of paper with water and make sure no part is left.
- Next, let your kids pour the watercolors directly onto the paper and ask them to turn the board a little here and there so that the watercolors can move around. As the watercolors move, they will form a beautiful pattern on the paper and mix with other colors to make new colors.
- Your kids can make as many layers of watercolors as they want, as it will make the prints come out more prominently.
- Once your kids are happy with the effect they have got, ask them to tilt the board and drip off all the excess paint into the bin.
- Place the watercolor paper aside and let it dry completely before taking off the tape from the sides.
19. Tape resist flower painting

You Will Need:
- Watercolor paper
- Watercolor paints
- Blue painters tape
- Some big salt crystals
How To:
- Ask your kid to cut out long strips from the watercolor tape.
- Make sure that your kids plan their painters tape designs carefully before starting, as whatever space they will leave blank will be painted over.
- Once the blue painters tape is used to make the art, ask your kids to start painting inside the outline of the flower that they created using the tape.
- To add some texture to the flower, ask your kid to sprinkle some salt crystals over the top of the watercolors even as they are all wet.
- Next, ask your kid to color all the remaining white areas on the paper in whatever color combination or theme he wants to.
- Once all of this is done, set the watercolor paper aside and let it dry completely for as long as it takes.
- Once the paper is fully dry, gently shake off the salt crystals to reveal the grainy texture.
- You will have to help your kid peel off the tape so that no paper comes along with it.
You can also include this painting project for kids in school.
20. Watercolor stickers

You Will Need:
- Watercolor tape
- Watercolors in your kid’s favorite colors
- Watercolor brushes
- Water
- A pair of safety scissors
- Washi or freezer tape
How To:
- Ask your kid to cut out long strips from the watercolor tape with washi or freezer tape, depending on what your kid will be using.
- Make sure that you secure the tape at very small intervals so that it doesn’t become wobbly and make it difficult for your kid to work with.
- As soon as the tape is in place, ask your kid to start painting on it with any technique he wants to.
- Once it is done, let the tape dry completely.
- Remove it from the area and roll it up.
- Help your kids to use these handmade watercolor stickers to decorate various items and gifts.
21. Spin art
Create unique patterns by using spin art.
You Will Need:
- Paper plates
- BioColors, Tempera paints, or Activity colors
- A pair of scissors
- Salad spinner
How To:
- Mix some colors together to create a dual shade paint or a mix of two beautiful colors.
- Now let your kid spoon the mix onto a paper plate. Make sure that you don’t add too much of the paint mix to the plate.
- Now place the paper plate in a salad spinner and fire it up.
- Take the plate out and repeat with another shade.
Frequently Asked Questions
1. Is painting good for a two-year-old?
Yes, playing with paint and painting helps two-year-olds boost their creative and imaginative skills. It also helps develop their hand-eye coordination and fine motor skills (5). However, adults should monitor when the two-year-old engages in art activities for toddlers to prevent any mishaps.
2. Which type of painting is best for beginners?
Acrylic paint is an excellent choice to start painting with for beginners, as it is easy to use, paint and clean up.
3. What are some age-appropriate painting techniques for young children?
Finger paint for toddlers helps them explore colors and textures using their hands. Stamping with sponges or objects of different shapes can also be engaging. As children grow older, they can begin experimenting with brush painting, watercolor techniques, and using different tools like cotton swabs or sponges.
4. How can parents encourage their children to enjoy painting?
Parents can encourage their children to enjoy painting by creating a positive and supportive environment. Offering praise and showing interest in their child’s artwork can boost their confidence and enthusiasm. Parents can also participate in painting activities with their children, making it a fun and bonding experience.
5. What are some ways to incorporate educational concepts into painting activities for kids?
Parents may incorporate educational concepts into painting activities by introducing themes or subjects that align with their child’s interests or curriculum. For example, they may encourage children to paint animals, plants, or landscapes to enhance their understanding of the natural world. Parents may also discuss colors, shapes, or patterns while painting, helping children understand these concepts.
6. How can parents create a safe and conducive environment for kids to paint in?
To create a safe and conducive environment for painting, parents should ensure the space is well-ventilated and free from hazards. Provide the children with child-friendly, non-toxic paints and art supplies. Allow them the freedom to explore and experiment. Avoid placing too many constraints or expectations, allowing them to enjoy the process of painting and self-expression (2).
7. How can parents incorporate painting into their child’s daily routine?
Parents can incorporate painting into their child’s daily routine by setting aside dedicated time for artistic activities. Find opportunities to incorporate painting into other daily routines. For example, you can incorporate painting into storytime by asking your child to paint a scene from a book they read. This helps connect painting with other activities and enhances their overall engagement.
8. How can painting enhance my child’s learning?
Painting encourages creative expression and imagination, especially when kids use materials other than paint to create art pieces. It also has other educational benefits as it acquaints children with real-world concepts and color theory. Moreover, it can help improve children’s communication and social skills as they paint in groups. Some children might also find the activity therapeutic and calming.
Painting offers various health benefits for children, including improved spatial awareness, hand-eye coordination, visual perception, and healthy expression of emotions. It is a hobby they may enjoy as a stress reliever even after growing up. To help them develop this hobby and keep them entertained, you can introduce them to these exciting painting ideas. Further, you can modify them depending on your child’s age and expertise. Save their artworks in a book or by clicking pictures so that they can cherish them when they are older.
Infographic: Advantages Of Teaching Painting To Children
Painting has numerous advantages for children. It strengthens both their physical and mental abilities, which are just growing. It also helps make children explore their likes and talents. Scroll through the infographic below to discover how painting can benefit your children.
Some thing wrong with infographic shortcode. please verify shortcode syntaxIllustration: Unique And Fun Painting Ideas For Kids To Try

Image: Stable Diffusion/MomJunction Design Team
Are you looking for more engaging painting ideas for your children? Here are ten easy painting ideas and hacks using everyday objects to make art with your children.
Personal Experience: Source
MomJunction articles include first-hand experiences to provide you with better insights through real-life narratives. Here are the sources of personal accounts referenced in this article.
i. Painting with cars;https://diyunlimitedfun.wordpress.com/2017/04/02/painting-with-cars/
References
- 5 Incredible Benefits of Art for Kids;
https://www.childcrisisaz.org/5-incredible-benefits-of-art-for-kids/ - Children’s art
https://extension.psu.edu/programs/betterkidcare/early-care/tip-pages/all/childrens-art
Community Experiences
Join the conversation and become a part of our nurturing community! Share your stories, experiences, and insights to connect with fellow parents.
Read full bio of Erin DeCarlo
Read full bio of Debolina Raja
Read full bio of Harshita Makvana
Read full bio of Kavita Kankani


