Image: Shutterstock
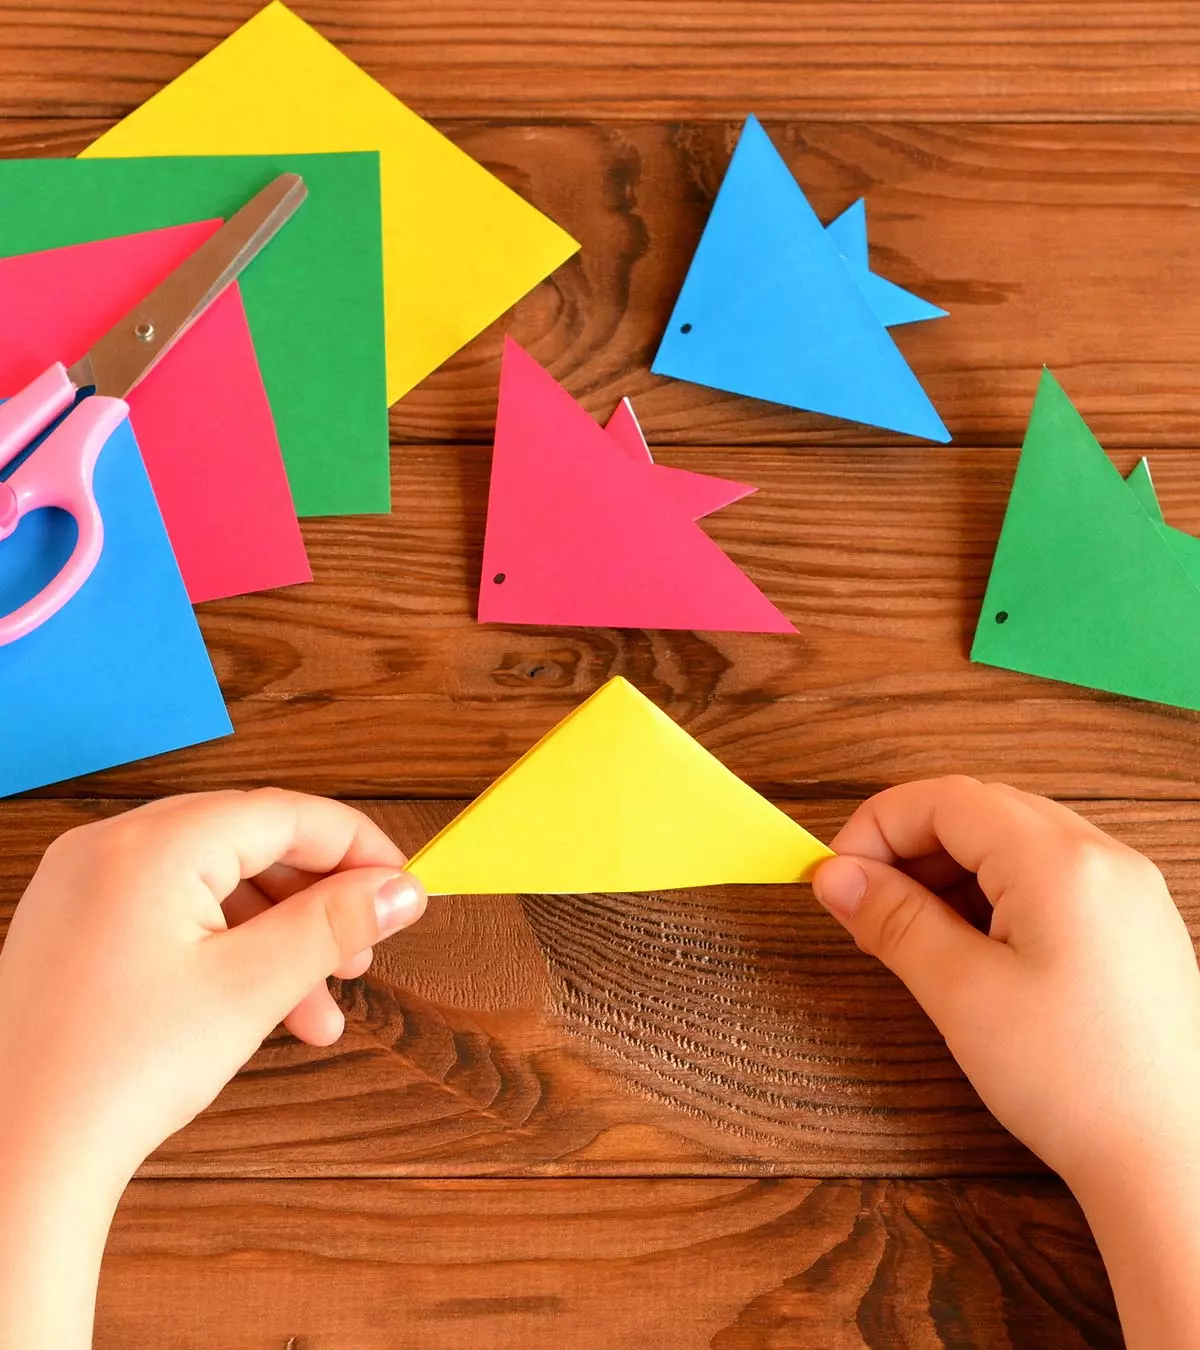
Paper animal crafts for kids put them up to a challenge and may inspire them to tap into their creative side. Paper is versatile: we use it to write, paint, draw, print, make books, and even create beautiful shapes.

On a rainy day when you don’t know how to keep your children engaged, get them involved in a craft session with paper. Since you can find most of these materials around the house, you won’t have a hard time organizing the activities either.
Further, encouraging children to take up creative activities such as paper crafts can help them develop their imagination. They can improve kids’ creativity and fine motor skills and encourage cognitive development in them. Thus, we have put together a tutorial to help your child make paper animal crafts without hassle.
Key Pointers
- Paper crafts with animal themes are a great activity for kids, especially on a rainy day.
- Paper is a versatile and accessible medium for crafts that can be found in most households.
- Encouraging children to do paper crafts can boost their imaginative skills.
- Simple paper animal or pet crafts can be made using materials such as paper plates, glue, and scissors.
Paper Plate Animals
Let us begin with simple crafts. For these, we will use a standard item we see in bakeries, parties, and picnics – paper plates!
1. Duck
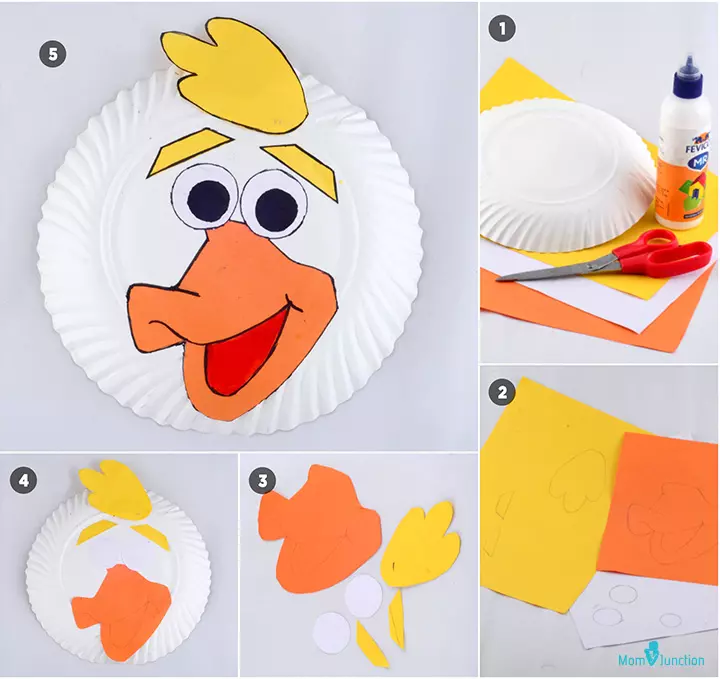
The duck says quack-quack. Well, not this one. The paper plate duck is cute and smiles, but is quiet. This one isn’t Daffy. A paper plate duck is one of the easiest bird crafts for kids.
You will need:
- White paper plate
- Color paper or construction paper– orange, yellow, white, and black
- Glue
- Scissors
- Pencil
- Sketch pens
How to:
- On the color paper, draw these shapes – duck’s beak, a crest for hair, eyebrows, and eyes. You can also take a printout of the template.
- Cut out the shapes as in image 3. The shapes are simple, which means your kids can cut them easily. However, we suggest you be around when they use the scissors.
- Stick the mouth, the crest and eyebrows as seen in image 4.
- After pasting the mouth and eyebrows, draw the outline of the mouth as seen in image 5, and color the inside of the mouth red. This makes the duck smile!
- Stick the white rounds for eyes and add a black circle to make the eyes look wiggly.
Your cute, smiling duck is ready.
2. Echidna
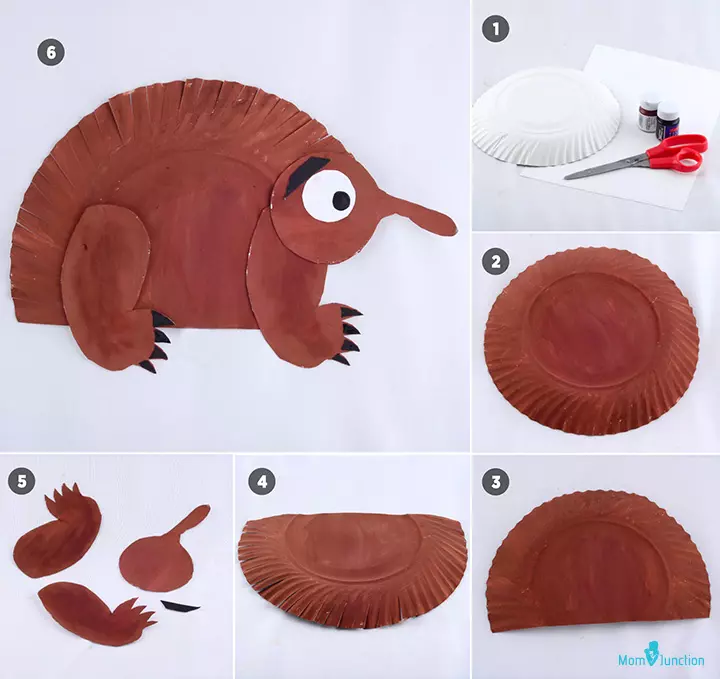
Did you know that the echidna is one of the only mammals in the world to lay eggs? The small, spiny animal is native to Australia and New Guinea.
You will need:
- Paper plate
- Glue
- Brown paint and paintbrush
- Scissors
- Printer and paper
- Brown paper
How to:
- Paint the bottom of the paper plate brown using the water or oil paints.
- Cut a quarter of the painted plate as seen in image 3.
- Use the scissors to cut the curved part of the plate as in image 4.
- Take prints of an echidna’s face, paws, and claws using the printer. Use a brown colored paper for this.
- Cut out the shapes as shown in image 5.
- Stick the legs to the bottom of the plate and the face, with the long nose, at the top. See image 6.
- Attach the eyebrows and eyes, and paint the claws black as seen in image
 Did you know?
3. Elephant

How can you make an elephant using a paper plate? Well, keep reading to know.
You will need:
- A paper plate
- Two sheets of white paper
- Paintbrushes
- Oil paints
- Scissors
How to:
- Ask your kids to paint the trunk and ears of an elephant as seen in image 2. Otherwise, print out a template of an elephant’s trunk and ears.
- Cut the shapes from the drawing or a template, as seen in image 3.
- Paint them any color you like; we chose a light shade of purple.
- Stick the ears and trunk as seen in image 5.
- Add the eyes, as seen in image 6.
Tip: You can create googly eyes stickers or print them out in different sizes for all the paper animal crafts.
4. Turkey
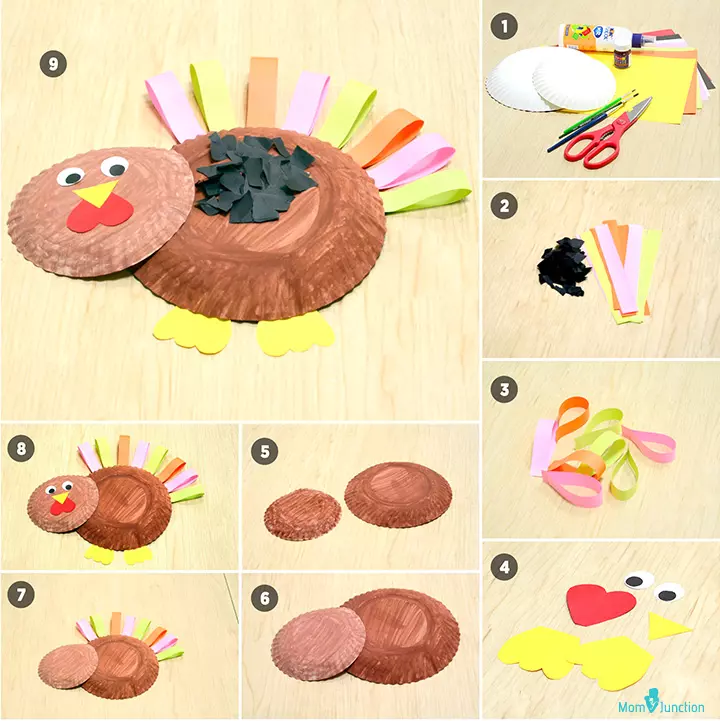
The paper plate turkey is a cute bird with a yellow nose and colorful plumes. You can make it easily, in just a few steps. But please don’t eat it!
You will need:
- One sheet each of red, pink, yellow, brown, orange, green, black and white colored paper
- Paints and paintbrush
- Scissors
- Glue
- Paper plates – one large plate and a smaller one
How to:
- Cut the colored papers into strips, as seen in image 2. Paint the white sheet black and cut it into small pieces. Crumple them and set aside.
- Stick the ends of the color paper strips as seen in image 3.
- Use the red sheet of paper to make a heart, and yellow for a small triangle. You can also draw yellow feet or use a template for it.
- Paint the bottom of the paper plates brown. Let them dry.
- Use the glue (or stapler) to stick the smaller paper plate on the bigger one, as seen in image 6.
- Attach the folded strips of paper for plumes on the body. Stick the eyes (used googly eyes template), the triangle and the heart on the smaller plate.
- Stick the crumpled black paper in the center of the larger paper plate.
The paper plate turkey is ready for display.
5. Fish
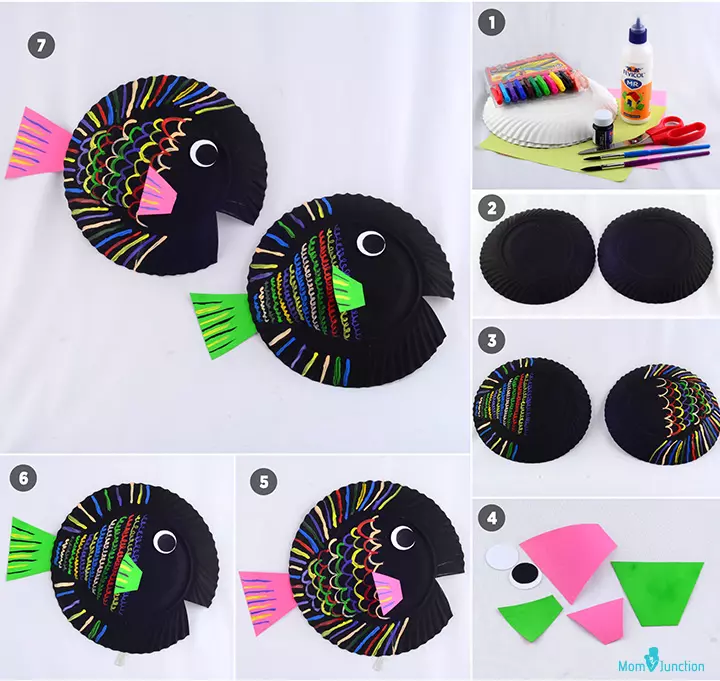
The last on our list of paper plate animals is the fish – one that does not swim. And no, you can’t eat this either.
You will need:
- Two paper plates
- Sketch pens
- Black paint and paintbrushes
- Glue
- Scissors
- Color paper
How to:
- Paint the bottom of the paper plates black. Leave them to dry.
- Use the sketch pen to draw the scales (we made them colorful) of the fish, as seen in image 3.
- Cut out the fins and the eyes as shown in image 4. Draw lines on the fins and stick them to the paper plate, as seen in image 5.
- Cut the paper plate a little, as seen in image 5, to indicate an open mouth.
- Repeat the same for the other paper plate.
- Two paper plate fishes are ready for display.
6. Caterpillar
The last one on this list is the paper plate caterpillar. It is a simple and easy-to-craft little green creature with big eyes and a smiling face.
You will need:
- One large paper plate
- Colorful paper
- Small wobbly eyes
- Paints and paintbrush
- Scissors
- Glue
How to:
1. Cut the paper plate into two equal halves.
2. Cut out the large center portion of the plate as we need only the curved rim for the caterpillar’s body.
3. Paint the rim with any colors of your choice.
4. As the paint dries, take the colorful paper, cut out two small heads with antennas, and stick it to one end of the rim. This is the face of the caterpillar.
5. Stick two wobbly eyes under the antennas and create a smiling face for your little creature.
6. Your cute caterpillar is ready for display.
 Quick tip
Origami – Paper Folding Animal Art
Origami is the art of folding paper to create something. In these tutorials, we will tell you how to fold paper to create paper animals. Origami paper animals are ideal for older kids, aged at least seven.
To make it simple for children, we have picked three easy-to-do origami crafts for kids.
7. Cat

The cat is one of the simplest origami animals that your kid can make.
You will need:
- One origami paper – gray or black color
How to:
- Start by making the origami paper a square.
- Fold it in half, diagonally.
- Fold it again in half, diagonally. Unfold.
- For the ears, fold the right and the left corners of the paper into triangles. See image 5.
- Fold the pointed edge at the top slightly, as you see in image 6.
- Turn the paper figure over.
- Add the eyes, nose, and whiskers as you see in image 8.
You have a kitten.
7. Jumping Frog

A frog that jumps need not be alive. Find out how to make a paper frog that jumps right here!
You will need:
- Green origami paper – A4 size
- Color pen
How to:
- Fold the top left corner of the rectangular sheet of paper, taking it to the right. See image 2.
- Unfold. Now fold the top right corner the same way. Unfold.
- Fold the paper backward, at the point where the creases of the “X” meet. You should see something like in image 6. Unfold the top.
- Now form a triangle by bringing the creases together. It may seem tricky, but all you need to do is hold the paper at the folded ends on either side and push inwards slowly. See image 8.
- Fold the left corner of the triangle towards the top of the triangle, as shown in image 9.
- Repeat with the other side as seen in image 10. You will see two triangles on either side.
- Now fold the two triangles in half (inwards) to get what you see in image 11.
- Fold the bottom to touch the right edges of the diamond or kite-like shape on top. See image 12.
- Fold the bottom rectangle in half, as seen in image 13.
- Turn it over to add eyes. To make the frog jump, press its back!
9. Fox
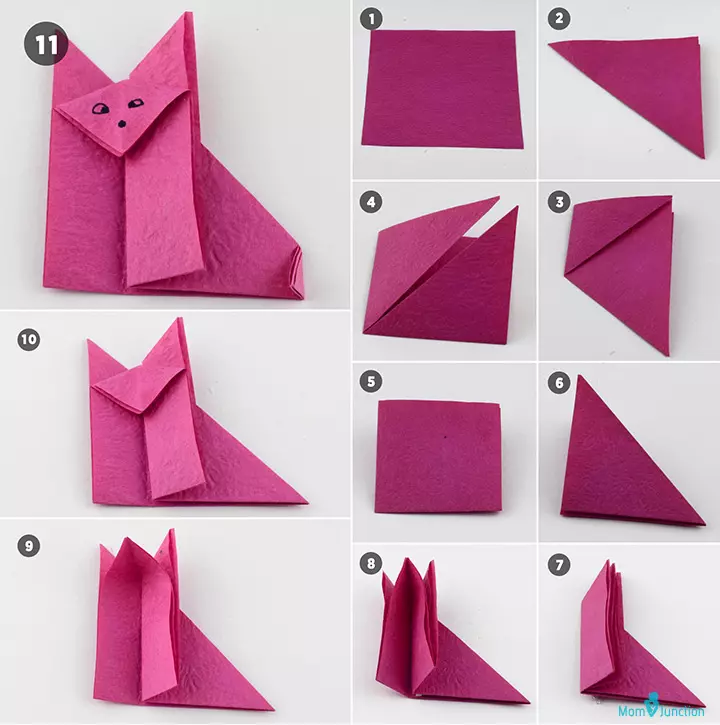
An origami fox may not look exactly like one, but it is close. And making it is fun, anyway. So, here are the instructions.
You will need:
- One square-shaped origami paper
- Color pen
How to:
- Fold the square paper diagonally in half. Place the paper as shown in image 2.
- Fold the top left corner of the paper to join the right. See image 3.
- Repeat step 2 for the upper-right corner, so you get a figure as seen in image 4.
- Turn the figure over and fold the top right corner to the lower left corner. See image 6.
- Fold the left part of the paper, as shown in image 7.
- Open up the creases as seen in image 8.
- Slightly bend the pointed section in the center downward as in image 9.
- Fold it to make the face. See image 10.
- Add the eyes and bend the pointed end at the right slightly, for the tail.
- The origami fox is ready.
 Point to consider
Paper Animal Masks
What fun are paper animals if you cannot play with them? So we have decided to make paper animal masks that you can use for birthdays or other parties. The good news is that these masks are made using templates.
10. Owl

The owl mask is slightly complicated, compared to the ones we do next. For this, you can get the template online. We used the templates from Martha Stewart’s paper animal masks page.
You will need:
- Owl mask template
- Scissors
- Craft knife
- Glue
- Color papers with different patterns, textures – you can use wrapping paper as well
- Elastic string
How to:
- Print out the animal head templates. You can also print the designs on pattern papers if possible.
- Using the scissors, cut out the shapes and sort them.
- Stick the pattern papers on all the cut outs, except the smaller face mask, as shown in image 3.
- Glue the smaller face mask on the bigger one in blue. See image 4.
- Use the crafting knife to punch holes in the mask.
- Stick the nose and the crown as seen in image 5.
- Stick the remaining feathers on the crown.
- Punch tiny holes on the sides to attach the string, and the mask is ready.
11. Bunny

Making paper masks is easier than you think it is. All you need is to find a bunny mask template.
You will need:
- Bunny mask template
- A sheet of white paper
- Sketch pens
- Craft knife
- String
How to:
- Print out the bunny mask template.
- Color it purple and yellow, or gray and white if you like Bugs Bunny!
- Cut out the eyes using the craft knife, to make peep-holes for the mask.
- Punch holes on the sides and attach the string.
12. Panda
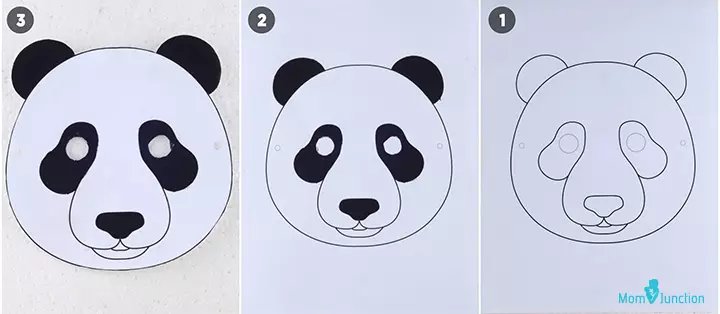
This is perhaps the simplest paper mask you can try. This idea is especially useful when you want to make paper masks in bulk, for a party or an event.
You will need:
- Panda face mask template (you can get it online)
- Craft knife
- String
- Black sketch
How to:
- Print the panda mask template on white paper.
- Color the ears, eyes and nose of the panda using a black sketch pen.
- Use the craft knife to cut out holes for the eyes.
- Punch holes on the sides and attach the string.
Paper Animal Using Templates
Using templates is an easy way to make paper animal crafts. But it is not all that easy either, which is why we recommend you try this with kids aged seven or more.
Note: We used the Meyamo DIY Fold-up animals template for the masks.
13. Monkey

A dangling monkey on the desk can be a great idea, as long as it is made of paper. Here is how to do it in just four steps.
You will need:
- One folding animal-monkey template
- A sheet of white paper
- Scissors
- Color pencils or crayons
How to:
- Print the folding monkey template on the white paper. There will be two monkeys, one the mirror image of the other.
- Color the monkeys orange and yellow, or brown and white. Or any other color you like. But color both of them the same.
- Use the scissors to cut along the dotted line. Be careful not to cut the fold line.
- Make sure that both the monkeys are of the same size so that when you fold them, they’re back to back.
14. Crocodile
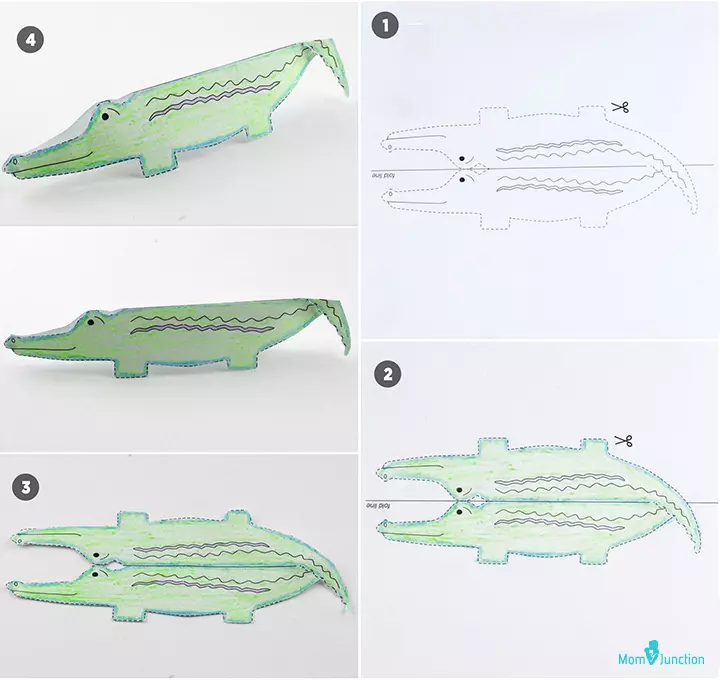
You can now make a paper crocodile in just four steps. Here is how.
You will need:
- A folding animal-crocodile template
- Scissors
- Glue
- White paper
How to:
- Print the folding crocodile template on the white paper.
- Color the crocodile green.
- Cut the shape using the scissors – ensure that you cut only along the dotted line.
- Fold it in half, along the fold line.
- Twist the tail a little, as shown in image 4.
15. Lion
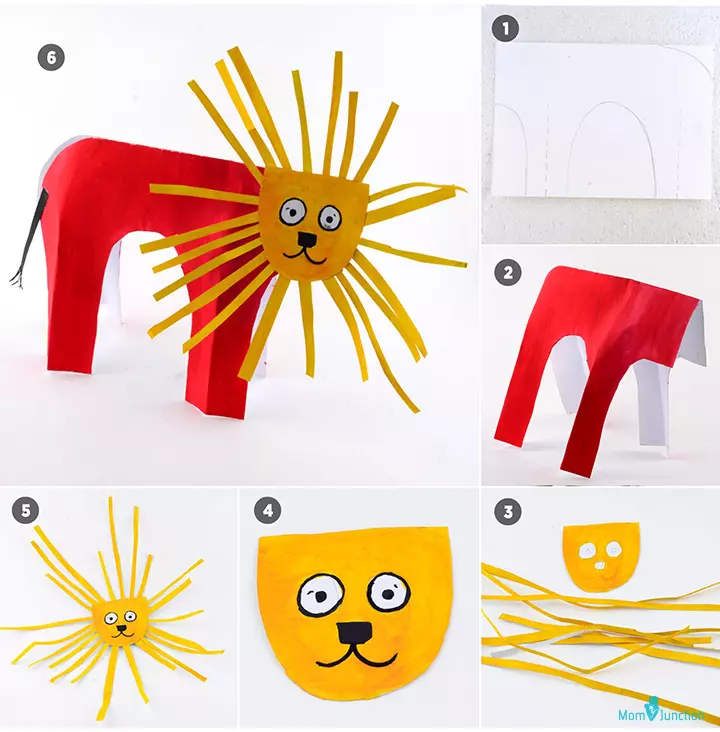
You need more than just a folding animal template to make the king of the jungle come alive on paper.
You will need:
- A sheet of white paper (A4 size)
- Color pencils or crayons
- Glue
- Scissors
How to:
- Fold the white paper in half. Draw a template on it as shown.
- Cut the paper along the lines to get the body of the lion. Color it red. You should get something as seen in image 2.
- Cut a small piece of white paper in the shape of a bowl – with a flat top, as seen in image 3. Paint it yellow with white dots for eyes and nose.
- Paint a small sheet of paper yellow and cut it into thin strips, for the mane.
- Paint the eyes and the nose on the face and stick the strips of paper to the edges, to complete the face.
- Draw a tail on the sheet of paper, using the black sketch and cut
16. Tiger
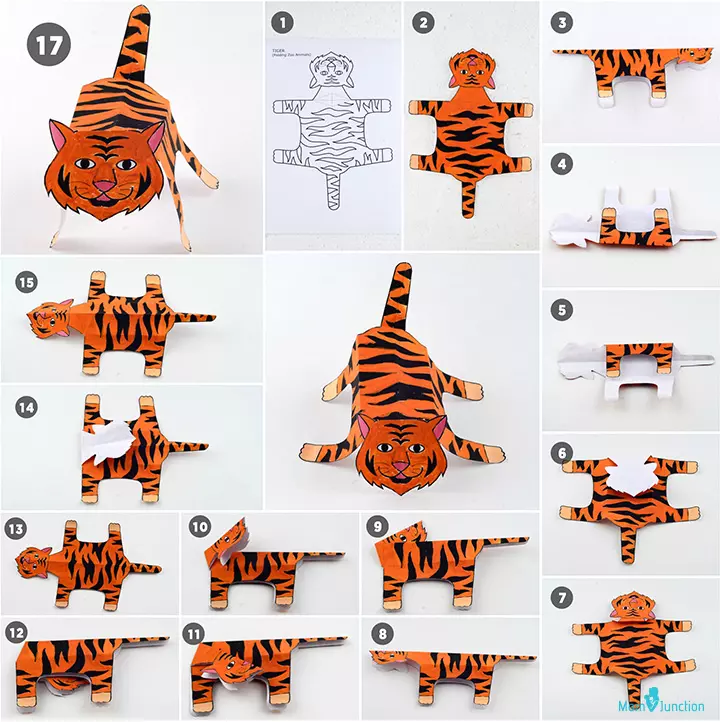
Tiger, tiger, burning bright…
The majestic tiger, which is sadly endangered, is one of the best paper animals you can teach your teen to make, perhaps for creating awareness about the dwindling numbers of the animal?
We have used the Folding Zoo Animal template for this project.
You will need:
- One tiger template
- A sheet of paper
- Color pencils or crayons
- Scissors
How to:
- Print the tiger template on the white paper and color it in orange and black. See image 2.
- Cut the image of the tiger using the scissors. Ensure that the shape is exact, without any rough edges or extra bits of paper hanging outside the design.
- This paper tiger can stand if you fold it properly. So begin by folding the tiger in half, and then unfold it.
- To make the tiger stand, you need to crease the paper near the legs.
- Fold each side inwards, from the legs down.
- Near the head are a few dotted lines, in the shape of a diamond or kite. Fold the tiger’s neck along the middle line, such that the neck is fully bent backward. See image 6
- Keeping the neck back, fold the head back inwards, as seen in image 7.
- Unfold and fold the paper in half again, like you did in step 3. See image 8
- While it is folded in half, fold the tiger’s head to one side, along the diagonal dotted line. See image 9. Fold it along the same like to the other side.
- Then fold it slightly downwards along the next dotted line, which is further from the head.
- Now fold it on the other side, as seen in image 12.
- Unfold.
- Fold the neck backward, again, keeping the creases in place.
- Unfold.
- To pop the head up a bit, pinch the triangle on the neck. This should push the torso in a little and bring the head up.
- Fold the head back inward again, at the base. See image 14.
- Curl the tail if it has, and make it stand on a flat surface.
Benefits Of Paper Animal Crafts For Kids
Creating paper animal crafts is a fun and enriching activity that nurtures overall development in kids. Here are the key benefits (2) (3).
- Improves fine motor skills: Cutting, folding, and gluing paper help strengthen hand muscles, improving dexterity, handwriting, and coordination.
- Sparks creativity and imagination: Decorating paper animals allows kids to use their imagination by mixing colors, patterns, and designs.
- Teaches problem-solving: Children learn how to put pieces together, fix mistakes, and figure out the best way to complete their craft.
- Builds focus and patience: Crafting takes time and attention, helping kids learn to concentrate and stay patient.
- Encourages storytelling and communication: Kids love to make up stories about their paper animals, improving their language and communication skills.
- Builds confidence and a sense of achievement: Completing a craft project gives children a sense of accomplishment, boosting self-esteem and pride in their creativity.
- Develops social skills: Working on crafts with others fosters teamwork, sharing, and collaboration. Children learn to communicate ideas, help peers, and appreciate different perspectives.
Frequently Asked Questions
1. How can children personalize and make their paper animal crafts unique?
By using different colors, shapes, and designs, adding stickers or glitters, and painting or drawing details like eyes and fur on paper, children can personalize their paper animal crafts and make them unique.
2. What are some educational benefits of making paper animal crafts with children?
Making paper animal crafts can have several educational benefits for children, including learning about different animals, their diet, and their habitat. These crafts can also help children improve their problem-solving skills and practice direction as they try to figure out how to fold the paper.
3. What are some fun ways to display or use paper animal crafts after they are made?
You can display your child’s paper animal crafts by hanging them around the house or by using them in school projects.
4. How can paper animal crafts help improve children’s hand-eye coordination?
As children fold paper, use scissors, and glue the pieces together to make an animal shape, these activities help them to practice and improve their hand-eye coordination.
5. What materials are best for paper animal crafts?
You may consider basic stationery materials such as colored construction paper, scissors, glue, markers, paper plates, origami paper, crayons, templates, and craft knives. You may also recycle old materials, such as old cartons and newspapers, to teach sustainability to children.
Children are the most creative, and you can help them utilize their skills and enhance them by engaging them in these paper animal crafts for kids. Make good use of the things lying around and involve your children to help them create tiny animals, birds, and insects by cutting, gluing, and folding papers through these animal paper craft ideas. You may even take them to botanical gardens, farms, or a wildlife safari for added inspiration. Origami, paper plates, or folding papers, let them tingle their little minds and use anything they wish to give life to their imagination.
Infographic: Interesting Paper Animal Crafts For Children
Making crafts with paper is one of the inexpensive, fun, and challenging activities for children. They can either fold the paper (origami) to make shapes or cut and shape the papers into different things. Look through the infographic below for some simple and fun animal crafts for children to make with paper.
Some thing wrong with infographic shortcode. please verify shortcode syntaxIllustration: Simply Creative Paper Animal Crafts For Kids
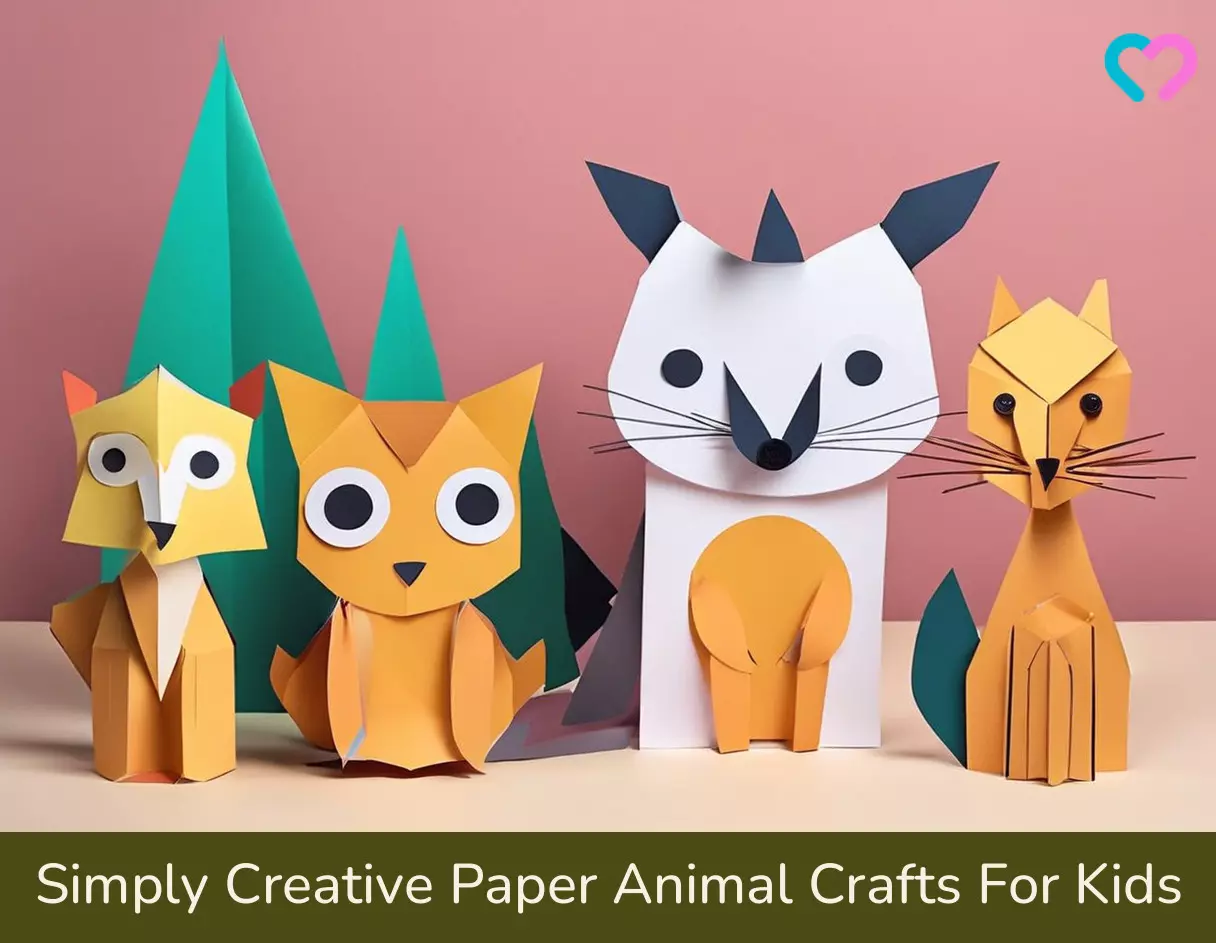
Image: Stable Diffusion/MomJunction Design Team
Discover the joy of crafting with your kids! This easy paper swan tutorial is perfect for little hands and big imaginations. Boost your child’s creativity as they create beautiful paper swans.
References
- The benefits of art masking for kids
https://www.playkettering.org/the-benefits-of-art-making-for-kids/ - The Benefits of Crafts in Storytime.
https://cpl.org/the-benefits-of-crafts-in-storytime/ - Make Animal Face Plates: Joint Attention.
https://anybabycan.org/blog/joint-attention-plates/
Community Experiences
Join the conversation and become a part of our nurturing community! Share your stories, experiences, and insights to connect with fellow parents.
Read full bio of Erin DeCarlo
Read full bio of Harshita Makvana
Read full bio of Deepa Thomas
Read full bio of Vaswati Chatterjee


